我就废话不多说了,还是直接看代码吧!
from osgeo import gdal, gdalnumeric, ogr
from PIL import Image, ImageDraw
from osgeo import gdal_array
import os
import operator
from functools import reduce
gdal.UseExceptions()


def readTif(fileName):
  dataset = gdal.Open(fileName)
  if dataset == None:
    print(fileName+"文件无法打开")
    return
  im_width = dataset.RasterXSize #栅格矩阵的列数
  im_height = dataset.RasterYSize #栅格矩阵的行数
  im_bands = dataset.RasterCount #波段数
  band1=dataset.GetRasterBand(1)
  print(band1)
  print ('Band Type=',gdal.GetDataTypeName(band1.DataType))
  im_data = dataset.ReadAsArray(0,0,im_width,im_height)#获取数据
  im_geotrans = dataset.GetGeoTransform()#获取仿射矩阵信息
  im_proj = dataset.GetProjection()#获取投影信息
  im_blueBand = im_data[0,0:im_height,0:im_width]#获取蓝波段
  im_greenBand = im_data[1,0:im_height,0:im_width]#获取绿波段
  im_redBand =  im_data[2,0:im_height,0:im_width]#获取红波段
  im_nirBand = im_data[3,0:im_height,0:im_width]#获取近红外波段

  return(im_width,im_height,im_bands,im_data,im_geotrans
      ,im_proj,im_blueBand,im_greenBand,im_redBand,im_nirBand)

#保存tif文件函数
import gdal
import numpy as np
def writeTiff(im_data,im_width,im_height,im_bands,im_geotrans,im_proj,path):
  if 'int8' in im_data.dtype.name:
    datatype = gdal.GDT_Byte
  elif 'int16' in im_data.dtype.name:
    datatype = gdal.GDT_UInt16
  else:
    datatype = gdal.GDT_Float32

  if len(im_data.shape) == 3:
    im_bands, im_height, im_width = im_data.shape
  elif len(im_data.shape) == 2:
    im_data = np.array([im_data])
  else:
    im_bands, (im_height, im_width) = 1,im_data.shape
    #创建文件
  driver = gdal.GetDriverByName("GTiff")
  dataset = driver.Create(path, im_width, im_height, im_bands, datatype)
  if(dataset!= None):
    dataset.SetGeoTransform(im_geotrans) #写入仿射变换参数
    dataset.SetProjection(im_proj) #写入投影
  for i in range(im_bands):
    dataset.GetRasterBand(i+1).WriteArray(im_data[i])
  del dataset

# This function will convert the rasterized clipper shapefile
# to a mask for use within GDAL.
def imageToArray(i):
  """
  Converts a Python Imaging Library array to a
  gdalnumeric image.
  """
  a=gdalnumeric.fromstring(i.tobytes(),'b')
  a.shape=i.im.size[1], i.im.size[0]
  return a


def arrayToImage(a):
  """
  Converts a gdalnumeric array to a
  Python Imaging Library Image.
  """
  i=Image.frombytes('L',(a.shape[1],a.shape[0]),
      (a.astype('b')).tobytes())
  return i

def world2Pixel(geoMatrix, x, y):
  """
  Uses a gdal geomatrix (gdal.GetGeoTransform()) to calculate
  the pixel location of a geospatial coordinate
  """
  ulX = geoMatrix[0]
  ulY = geoMatrix[3]
  xDist = geoMatrix[1]
  pixel = int((x - ulX) / xDist)
  line = int((ulY - y) / xDist)
  return (pixel, line)

#
# EDIT: this is basically an overloaded
# version of the gdal_array.OpenArray passing in xoff, yoff explicitly
# so we can pass these params off to CopyDatasetInfo
#
def OpenArray( array, prototype_ds = None, xoff=0, yoff=0 ):
  ds =gdal_array.OpenArray(array)

  if ds is not None and prototype_ds is not None:
    if type(prototype_ds).__name__ == 'str':
      prototype_ds = gdal.Open( prototype_ds )
    if prototype_ds is not None:
      gdalnumeric.CopyDatasetInfo( prototype_ds, ds, xoff=xoff, yoff=yoff )
  return ds

def histogram(a, bins=range(0,256)):
  """
  Histogram function for multi-dimensional array.
  a = array
  bins = range of numbers to match
  """
  fa = a.flat
  n = gdalnumeric.searchsorted(gdalnumeric.sort(fa), bins)
  n = gdalnumeric.concatenate([n, [len(fa)]])
  hist = n[1:]-n[:-1]
  return hist

def stretch(a):
  """
  Performs a histogram stretch on a gdalnumeric array image.
  """
  hist = histogram(a)
  im = arrayToImage(a)
  lut = []
  for b in range(0, len(hist), 256):
    # step size
    step = reduce(operator.add, hist[b:b+256]) / 255
    # create equalization lookup table
    n = 0
    for i in range(256):
      lut.append(n / step)
      n = n + hist[i+b]
    im = im.point(lut)
  return imageToArray(im)

def main( shapefile_path, raster_path ):
  # Load the source data as a gdalnumeric array
  srcArray = gdalnumeric.LoadFile(raster_path)

  # Also load as a gdal image to get geotransform
  # (world file) info
  srcImage = gdal.Open(raster_path)
  geoTrans = srcImage.GetGeoTransform()

  # Create an OGR layer from a boundary shapefile
  shapef = ogr.Open(shapefile_path)
  lyr = shapef.GetLayer( os.path.split( os.path.splitext( shapefile_path )[0] )[1] )
  poly = lyr.GetNextFeature()

  # Convert the layer extent to image pixel coordinates
  minX, maxX, minY, maxY = lyr.GetExtent()
  ulX, ulY = world2Pixel(geoTrans, minX, maxY)
  lrX, lrY = world2Pixel(geoTrans, maxX, minY)

  # Calculate the pixel size of the new image
  pxWidth = int(lrX - ulX)
  pxHeight = int(lrY - ulY)

  clip = srcArray[:, ulY:lrY, ulX:lrX]

  #
  # EDIT: create pixel offset to pass to new image Projection info
  #
  xoffset = ulX
  yoffset = ulY
  print ("Xoffset, Yoffset = ( %f, %f )" % ( xoffset, yoffset ))

  # Create a new geomatrix for the image
  geoTrans = list(geoTrans)
  geoTrans[0] = minX
  geoTrans[3] = maxY

  # Map points to pixels for drawing the
  # boundary on a blank 8-bit,
  # black and white, mask image.
  points = []
  pixels = []
  geom = poly.GetGeometryRef()
  pts = geom.GetGeometryRef(0)
  for p in range(pts.GetPointCount()):
   points.append((pts.GetX(p), pts.GetY(p)))
  for p in points:
   pixels.append(world2Pixel(geoTrans, p[0], p[1]))
  rasterPoly = Image.new("L", (pxWidth, pxHeight), 1)
  rasterize = ImageDraw.Draw(rasterPoly)
  rasterize.polygon(pixels, 0)
  mask = imageToArray(rasterPoly)

  # Clip the image using the mask
  clip = gdalnumeric.choose(mask, \
    (clip, 0)).astype(gdalnumeric.uint8)

  # This image has 3 bands so we stretch each one to make them
  # visually brighter
  for i in range(4):
   clip[i,:,:] = stretch(clip[i,:,:])

  # Save new tiff
  #
  # EDIT: instead of SaveArray, let's break all the
  # SaveArray steps out more explicity so
  # we can overwrite the offset of the destination
  # raster
  #
  ### the old way using SaveArray
  #
  # gdalnumeric.SaveArray(clip, "OUTPUT.tif", format="GTiff", prototype=raster_path)
  #
  ###
  #
  gtiffDriver = gdal.GetDriverByName( 'GTiff' )
  if gtiffDriver is None:
    raise ValueError("Can't find GeoTiff Driver")
  gtiffDriver.CreateCopy( "beijing1.tif",
    OpenArray( clip, prototype_ds=raster_path, xoff=xoffset, yoff=yoffset )
  )
  print(raster_path)

  # Save as an 8-bit jpeg for an easy, quick preview
  clip = clip.astype(gdalnumeric.uint8)
  gdalnumeric.SaveArray(clip, "beijing1.jpg", format="JPEG")

  gdal.ErrorReset()


if __name__ == '__main__':
  #shapefile_path, raster_path
  shapefile_path = r'C:\Users\Administrator\Desktop\裁切shp\New_Shapefile.shp'
  raster_path = r'C:\Users\Administrator\Desktop\2230542.tiff'

  main( shapefile_path, raster_path )
补充知识:python代码裁剪tiff影像图和转换成png格式+裁剪Png图片
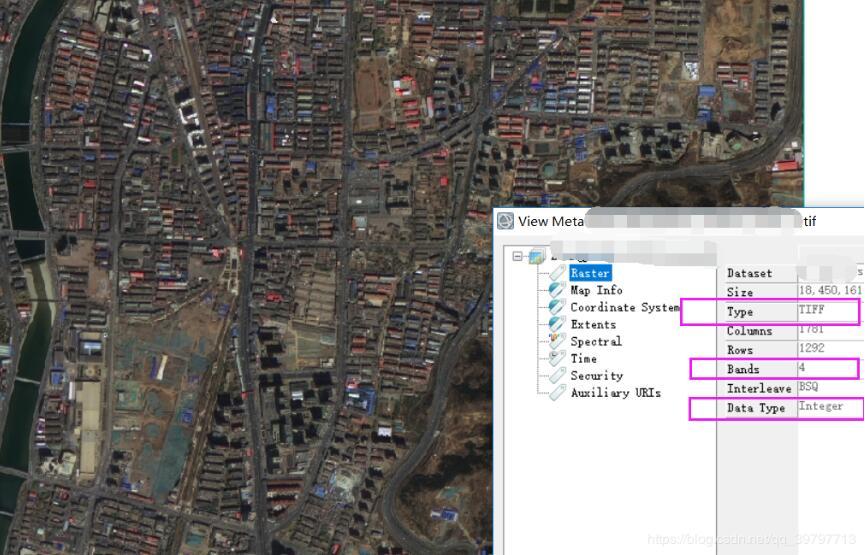
先来看一下需要转换的tiff原始图的信息,如下图所示。
tiff转换成png和裁剪tiff的代码(opencv)
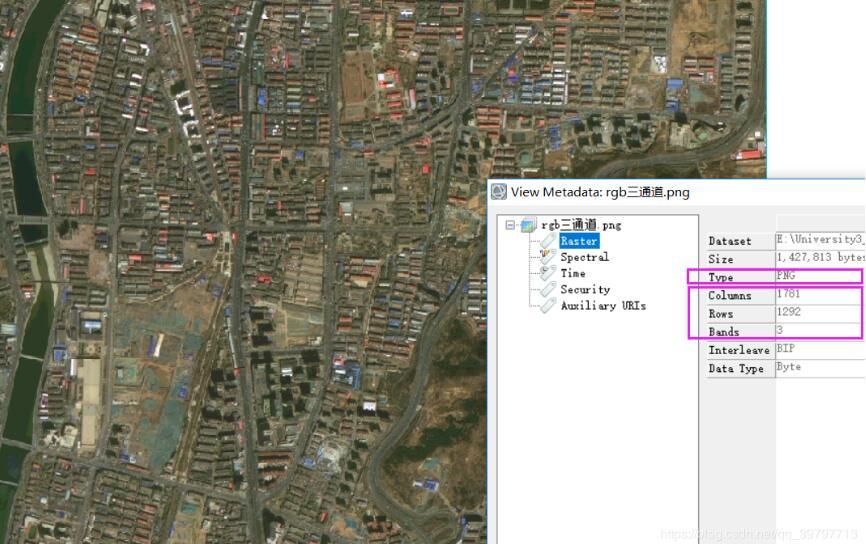
import cv2 as cv
import os

"""
  转换tiff格式为png + 横向裁剪tiff遥感影像图
"""
def Convert_To_Png_AndCut(dir):
  files = os.listdir(dir)
  ResultPath1 = "./RS_ToPngDir/" # 定义转换格式后的保存路径
  ResultPath2 = "./RS_Cut_Result/" # 定义裁剪后的保存路径
  ResultPath3 = "./RS_Cut_Result/" # 定义裁剪后的保存路径
  for file in files: # 这里可以去掉for循环
    a, b = os.path.splitext(file) # 拆分影像图的文件名称
    this_dir = os.path.join(dir + file) # 构建保存 路径+文件名

    img = cv.imread(this_dir, 1) # 读取tif影像
    # 第二个参数是通道数和位深的参数,
    # IMREAD_UNCHANGED = -1 # 不进行转化,比如保存为了16位的图片,读取出来仍然为16位。
    # IMREAD_GRAYSCALE = 0 # 进行转化为灰度图,比如保存为了16位的图片,读取出来为8位,类型为CV_8UC1。
    # IMREAD_COLOR = 1  # 进行转化为RGB三通道图像,图像深度转为8位
    # IMREAD_ANYDEPTH = 2 # 保持图像深度不变,进行转化为灰度图。
    # IMREAD_ANYCOLOR = 4 # 若图像通道数小于等于3,则保持原通道数不变;若通道数大于3则只取取前三个通道。图像深度转为8位

    cv.imwrite(ResultPath1 + a + "_" + ".png", img) # 保存为png格式

    # 下面开始裁剪-不需要裁剪tiff格式的可以直接注释掉
    hight = img.shape[0] #opencv写法,获取宽和高
    width = img.shape[1]
    #定义裁剪尺寸
    w = 480 # 宽度
    h = 360 # 高度
    _id = 1 # 裁剪结果保存文件名:0 - N 升序方式
    i = 0
    while (i + h <= hight): # 控制高度,图像多余固定尺寸总和部分不要了
      j = 0
      while (j + w <= width):  # 控制宽度,图像多余固定尺寸总和部分不要了
        cropped = img[i:i + h, j:j + w] # 裁剪坐标为[y0:y1, x0:x1]
        cv.imwrite(ResultPath2 + a + "_" + str(_id) + b, cropped)
        _id += 1
        j += w
      i = i + h
"""
  横向裁剪PNG图
"""
def toCutPng(dir):
  files = os.listdir(dir)
  ResultPath = "./RS_CutPng_Result/" # 定义裁剪后的保存路径
  for file in files:
    a, b = os.path.splitext(file) # 拆分影像图的文件名称
    this_dir = os.path.join(dir + file)
    img = Image.open(this_dir) # 按顺序打开某图片
    width, hight = img.size
    w = 480 # 宽度
    h = 360 # 高度
    _id = 1 # 裁剪结果保存文件名:0 - N 升序方式
    y = 0
    while (y + h <= hight): # 控制高度,图像多余固定尺寸总和部分不要了
      x = 0
      while (x + w <= width):  # 控制宽度,图像多余固定尺寸总和部分不要了
        new_img = img.crop((x, y, x + w, y + h))
        new_img.save(ResultPath + a + "_" + str(_id) + b)
        _id += 1
        x += w
      y = y + h

if __name__ == '__main__':
  _path = r"./RS_TiffDir/"  # 遥感tiff影像所在路径
  # 裁剪影像图
  Convert_To_Png_AndCut(_path)
将转换成png后的图加载到软件中(专业软件ENVI5.3)查看结果详细信息如下图所示,成功的转换成png格式了。
下面是加载裁剪后的影像图(Tiff格式的)
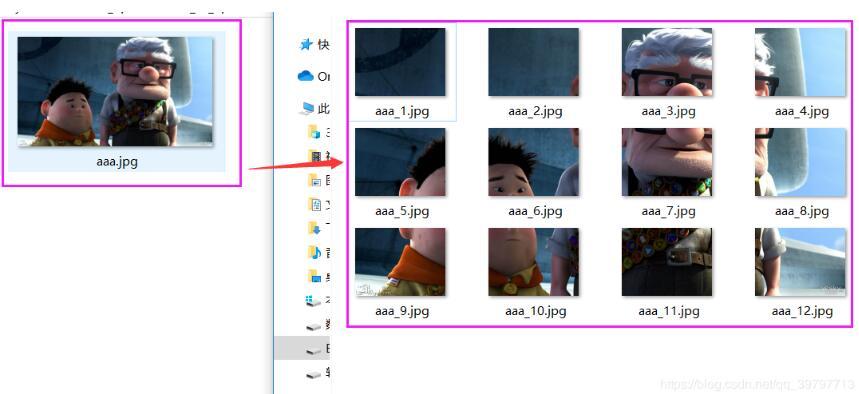
def toCutPng(dir):函数效果图如下图所示。
以上这篇利用Python裁切tiff图像且读取tiff,shp文件的实例就是小编分享给大家的全部内容了,希望能给大家一个参考,也希望大家多多支持python博客。
-
<< 上一篇 下一篇 >>
标签:numpy
利用Python裁切tiff图像且读取tiff,shp文件的实例
看: 1661次 时间:2020-08-05 分类 : python教程
- 相关文章
- 2021-12-20Python 实现图片色彩转换案例
- 2021-12-20python初学定义函数
- 2021-12-20图文详解Python如何导入自己编写的py文件
- 2021-12-20python二分法查找实例代码
- 2021-12-20Pyinstaller打包工具的使用以及避坑
- 2021-12-20Facebook开源一站式服务python时序利器Kats详解
- 2021-12-20pyCaret效率倍增开源低代码的python机器学习工具
- 2021-12-20python机器学习使数据更鲜活的可视化工具Pandas_Alive
- 2021-12-20python读写文件with open的介绍
- 2021-12-20Python生成任意波形并存为txt的实现
-
搜索
-
-
推荐资源
-
Powered By python教程网 鲁ICP备18013710号
python博客 - 小白学python最友好的网站!