本文实例为大家分享了python实现图像拼接的具体代码,供大家参考,具体内容如下
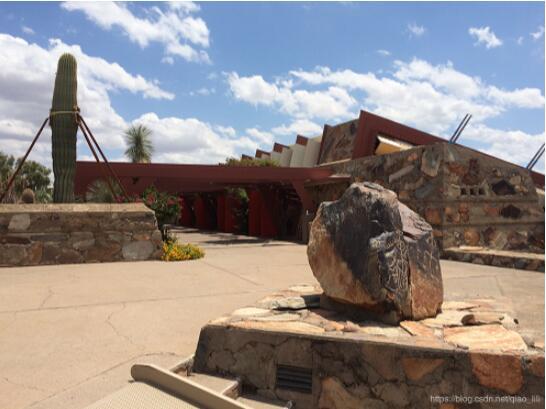
1.待拼接的图像

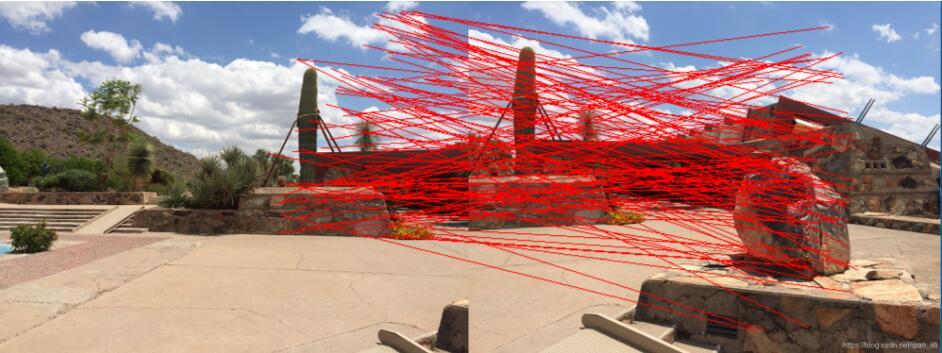
2. 基于SIFT特征点和RANSAC方法得到的图像特征点匹配结果
3.图像变换结果

4.代码及注意事项
import cv2
import numpy as np


def cv_show(name, image):
 cv2.imshow(name, image)
 cv2.waitKey(0)
 cv2.destroyAllWindows()


def detectAndCompute(image):
 image = cv2.cvtColor(image, cv2.COLOR_BGR2GRAY)
 sift = cv2.xfeatures2d.SIFT_create()
 (kps, features) = sift.detectAndCompute(image, None)
 kps = np.float32([kp.pt for kp in kps]) # 得到的点需要进一步转换才能使用
 return (kps, features)


def matchKeyPoints(kpsA, kpsB, featuresA, featuresB, ratio = 0.75, reprojThresh = 4.0):
 # ratio是最近邻匹配的推荐阈值
 # reprojThresh是随机取样一致性的推荐阈值
 matcher = cv2.BFMatcher()
 rawMatches = matcher.knnMatch(featuresA, featuresB, 2)
 matches = []
 for m in rawMatches:
  if len(m) == 2 and m[0].distance < ratio * m[1].distance:
   matches.append((m[0].queryIdx, m[0].trainIdx))
 kpsA = np.float32([kpsA[m[0]] for m in matches]) # 使用np.float32转化列表
 kpsB = np.float32([kpsB[m[1]] for m in matches])
 (M, status) = cv2.findHomography(kpsA, kpsB, cv2.RANSAC, reprojThresh)
 return (M, matches, status) # 并不是所有的点都有匹配解,它们的状态存在status中


def stich(imgA, imgB, M):
 result = cv2.warpPerspective(imgA, M, (imgA.shape[1] + imgB.shape[1], imgA.shape[0]))
 result[0:imageA.shape[0], 0:imageB.shape[1]] = imageB
 cv_show('result', result)


def drawMatches(imgA, imgB, kpsA, kpsB, matches, status):
 (hA, wA) = imgA.shape[0:2]
 (hB, wB) = imgB.shape[0:2]
 # 注意这里的3通道和uint8类型
 drawImg = np.zeros((max(hA, hB), wA + wB, 3), 'uint8')
 drawImg[0:hB, 0:wB] = imageB
 drawImg[0:hA, wB:] = imageA
 for ((queryIdx, trainIdx),s) in zip(matches, status):
  if s == 1:
   # 注意将float32 --> int
   pt1 = (int(kpsB[trainIdx][0]), int(kpsB[trainIdx][1]))
   pt2 = (int(kpsA[trainIdx][0]) + wB, int(kpsA[trainIdx][1]))
   cv2.line(drawImg, pt1, pt2, (0, 0, 255))
 cv_show("drawImg", drawImg)


# 读取图像
imageA = cv2.imread('./right_01.png')
cv_show("imageA", imageA)
imageB = cv2.imread('./left_01.png')
cv_show("imageB", imageB)
# 计算SIFT特征点和特征向量
(kpsA, featuresA) = detectAndCompute(imageA)
(kpsB, featuresB) = detectAndCompute(imageB)
# 基于最近邻和随机取样一致性得到一个单应性矩阵
(M, matches, status) = matchKeyPoints(kpsA, kpsB, featuresA, featuresB)
# 绘制匹配结果
drawMatches(imageA, imageB, kpsA, kpsB, matches, status)
# 拼接
stich(imageA, imageB, M)
以上就是本文的全部内容,希望对大家的学习有所帮助,也希望大家多多支持python博客。
-
<< 上一篇 下一篇 >>
标签:numpy
python实现图像拼接
看: 2642次 时间:2020-08-08 分类 : python教程
- 相关文章
- 2021-12-20Python 实现图片色彩转换案例
- 2021-12-20python初学定义函数
- 2021-12-20图文详解Python如何导入自己编写的py文件
- 2021-12-20python二分法查找实例代码
- 2021-12-20Pyinstaller打包工具的使用以及避坑
- 2021-12-20Facebook开源一站式服务python时序利器Kats详解
- 2021-12-20pyCaret效率倍增开源低代码的python机器学习工具
- 2021-12-20python机器学习使数据更鲜活的可视化工具Pandas_Alive
- 2021-12-20python读写文件with open的介绍
- 2021-12-20Python生成任意波形并存为txt的实现
-
搜索
-
-
推荐资源
-
Powered By python教程网 鲁ICP备18013710号
python博客 - 小白学python最友好的网站!