写在前面
因为暂时还没有想好做什么具体的某个项目来提升对python的理解,所以就自己想着做一下小玩意来加强一下自己对一些库和方法的理解
分析
1、截屏
截屏的话有pillow这个模块,并且就两条语句,后面会看到
2、定时任务
定时的话涉及到时间,所以会引入time这个模块
3、保存
保存的话因为是会有多个图片,所以需要一个目录来接,这里我就放在了根目录下的png目录下,并且对目录是否存在做了处理
代码
# python3 author jin xiang
import time
from PIL import ImageGrab
import os

#这里是为了如果找不到png这个目录的情况自己建一个png目录
absPath = os.path.abspath('.')
path = [x for x in os.listdir('.') if os.path.isdir(x)]
# print(path)
if 'png' in path:
  #print('yes')
  pass
else:
 #print('no')
  #创建目录
  pngPath = os.path.join(absPath,'png')
  os.mkdir(pngPath)

#截屏
def Screenshot():
 nowtime = time.strftime('%Y_%m_%d_%H_%M_%S',time.localtime(time.time()))
 print(nowtime)
 # 截屏语句很简单的
  im = ImageGrab.grab()
  # 保存(图个有png路径或者别的路径需要在这个路径下有这个目录,不然报错,所以我前面是做了规避,没路径我就自己建一个)
  im.save(r'png\%s.png' %(nowtime))
while True:
 print("截图!")
  Screenshot()

  print("暂停")
  print("\n")
  time.sleep(10) #定时10s看一下
效果
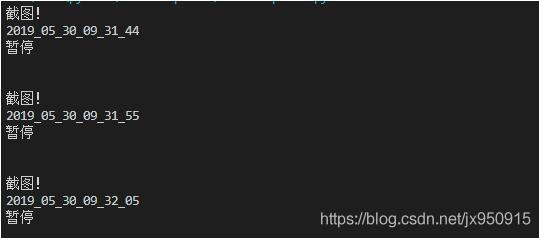
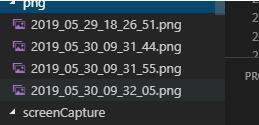
图片成功保存了。
补充知识:python opencv 定时器 摄像头自动截图小程序
我就废话不多说了,大家还是直接看代码吧~
import threading
import cv2
global timer
import sys

def shot_img():
  global num
  success, frame = cameraCapture.read()
  path = "H://pythonr"
  cv2.imwrite( path +'a[num]' + '.jpg', frame)
  print(num)
  num += 1
  if num==10:
    cameraCapture.release()
    cv2.destroyAllWindows()
    sys.exit()
  timer = threading.Timer(1, shot_img)
  timer.start()

if __name__ == '__main__':
  num=0
  cameraCapture = cv2.VideoCapture(0)
  timer = threading.Timer(1,shot_img)
  timer.start()
以上这篇python定时截屏实现就是小编分享给大家的全部内容了,希望能给大家一个参考,也希望大家多多支持python博客。
-
<< 上一篇 下一篇 >>
python定时截屏实现
看: 1627次 时间:2020-12-02 分类 : python教程
- 相关文章
- 2021-12-20Python 实现图片色彩转换案例
- 2021-12-20python初学定义函数
- 2021-12-20图文详解Python如何导入自己编写的py文件
- 2021-12-20python二分法查找实例代码
- 2021-12-20Pyinstaller打包工具的使用以及避坑
- 2021-12-20Facebook开源一站式服务python时序利器Kats详解
- 2021-12-20pyCaret效率倍增开源低代码的python机器学习工具
- 2021-12-20python机器学习使数据更鲜活的可视化工具Pandas_Alive
- 2021-12-20python读写文件with open的介绍
- 2021-12-20Python生成任意波形并存为txt的实现
-
搜索
-
-
推荐资源
-
Powered By python教程网 鲁ICP备18013710号
python博客 - 小白学python最友好的网站!