使用OpenCV和Python查找图片差异
flyfish
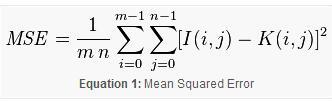
方法1 均方误差的算法(Mean Squared Error , MSE)
下面的一些表达与《TensorFlow - 协方差矩阵》式子表达式一样的
拟合 误差平方和( sum of squared errors)
residual sum of squares (RSS), also known as the sum of squared residuals (SSR) or the sum of squared errors of prediction (SSE),
also known as 就我们所说的
RSS, SSR ,SSE表达的是一个意思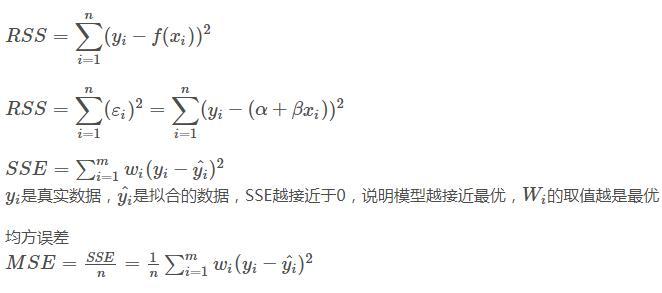
def mse(imageA, imageB):
 # the 'Mean Squared Error' between the two images is the
 # sum of the squared difference between the two images;
 # NOTE: the two images must have the same dimension
 err = np.sum((imageA.astype("float") - imageB.astype("float")) ** 2)
 err /= float(imageA.shape[0] * imageA.shape[1])

 # return the MSE, the lower the error, the more "similar"
 # the two images are
 return err
方法2 SSIM
structural similarity index measurement (SSIM) system
一种衡量两幅图像结构相似度的新指标,其值越大越好,最大为1。
新建一个Python文件,命名为 image_diff.py
原文
Image Difference with OpenCV and Python
原理

根据参数读取两张图片并转换为灰度:
使用SSIM计算两个图像之间的差异,这种方法已经在scikit-image 库中实现
在两个图像之间的不同部分绘制矩形边界框。
代码如下 已编译通过
from skimage.measure import compare_ssim #~ import skimage as ssim import argparse import imutils import cv2 # construct the argument parse and parse the arguments ap = argparse.ArgumentParser() ap.add_argument("-f", "--first", required=True, help="first input image") ap.add_argument("-s", "--second", required=True, help="second") args = vars(ap.parse_args()) # load the two input images imageA = cv2.imread(args["first"]) imageB = cv2.imread(args["second"]) ''' imageA = cv2.imread("E:\\1.png") imageB = cv2.imread("E:\\2.png") ''' # convert the images to grayscale grayA = cv2.cvtColor(imageA, cv2.COLOR_BGR2GRAY) grayB = cv2.cvtColor(imageB, cv2.COLOR_BGR2GRAY) # compute the Structural Similarity Index (SSIM) between the two # images, ensuring that the difference image is returned #structural similarity index measurement (SSIM) system一种衡量两幅图像结构相似度的新指标,其值越大越好,最大为1。 (score, diff) = compare_ssim(grayA, grayB, full=True) diff = (diff * 255).astype("uint8") print("SSIM: {}".format(score)) # threshold the difference image, followed by finding contours to # obtain the regions of the two input images that differ thresh = cv2.threshold(diff, 0, 255, cv2.THRESH_BINARY_INV | cv2.THRESH_OTSU)[1] cnts = cv2.findContours(thresh.copy(), cv2.RETR_EXTERNAL, cv2.CHAIN_APPROX_SIMPLE) cnts = cnts[0] if imutils.is_cv2() else cnts[1] # loop over the contours for c in cnts: # compute the bounding box of the contour and then draw the # bounding box on both input images to represent where the two # images differ (x, y, w, h) = cv2.boundingRect(c) cv2.rectangle(imageA, (x, y), (x + w, y + h), (0, 0, 255), 2) cv2.rectangle(imageB, (x, y), (x + w, y + h), (0, 0, 255), 2) # show the output images cv2.imshow("Original", imageA) cv2.imshow("Modified", imageB) cv2.imshow("Diff", diff) cv2.imshow("Thresh", thresh) cv2.waitKey(0)使用方法
python image_diff.py –first original.png –second images/modified.png如果不想使用参数将参数代码部分直接变成
imageA = cv2.imread(“E:\1.png”)
imageB = cv2.imread(“E:\2.png”)
以上这篇利用OpenCV和Python实现查找图片差异就是小编分享给大家的全部内容了,希望能给大家一个参考,也希望大家多多支持python博客。
-
<< 上一篇 下一篇 >>
利用OpenCV和Python实现查找图片差异
看: 1404次 时间:2021-01-06 分类 : python教程
- 相关文章
- 2021-12-20Python 实现图片色彩转换案例
- 2021-12-20python初学定义函数
- 2021-12-20图文详解Python如何导入自己编写的py文件
- 2021-12-20python二分法查找实例代码
- 2021-12-20Pyinstaller打包工具的使用以及避坑
- 2021-12-20Facebook开源一站式服务python时序利器Kats详解
- 2021-12-20pyCaret效率倍增开源低代码的python机器学习工具
- 2021-12-20python机器学习使数据更鲜活的可视化工具Pandas_Alive
- 2021-12-20python读写文件with open的介绍
- 2021-12-20Python生成任意波形并存为txt的实现
-
搜索
-
-
推荐资源
-
Powered By python教程网 鲁ICP备18013710号
python博客 - 小白学python最友好的网站!