K线图
概念
股市及期货市bai场中的K线图的du画法包含四个zhi数据,即开盘dao价、最高价、最低价zhuan、收盘价,所有的shuk线都是围绕这四个数据展开,反映大势的状况和价格信息。如果把每日的K线图放在一张纸上,就能得到日K线图,同样也可画出周K线图、月K线图。研究金融的小伙伴肯定比较熟悉这个,那么我们看起来比较复杂的K线图,又是这样画出来的,本文我们将一起探索K线图的魅力与神奇之处吧!
K线图
用处
K线图用处于股票分析,作为数据分析,以后的进入大数据肯定是一个趋势和热潮,K线图的专业知识,说实话肯定比较的复杂,这里就不做过多的展示了,有兴趣的小伙伴去问问百度小哥哥哟!
K线图系列模板
最简单的K线图绘制
第一个K线图绘制,来看看需要哪些参数吧,数据集都有四个必要的哟!
import pyecharts.options as opts
from pyecharts.charts import Candlestick

x_data = ["2017-10-24", "2017-10-25", "2017-10-26", "2017-10-27"]
y_data = [[20, 30, 10, 35], [40, 35, 30, 55], [33, 38, 33, 40], [40, 40, 32, 42]]

(
 Candlestick(init_opts=opts.InitOpts(width="1200px", height="600px"))
 .add_xaxis(xaxis_data=x_data)
 .add_yaxis(series_name="", y_axis=y_data)
 .set_series_opts()
 .set_global_opts(
  yaxis_opts=opts.AxisOpts(
   splitline_opts=opts.SplitLineOpts(
    is_show=True, linestyle_opts=opts.LineStyleOpts(width=1)
   )
  )
 )
 .render("简单K线图.html")
)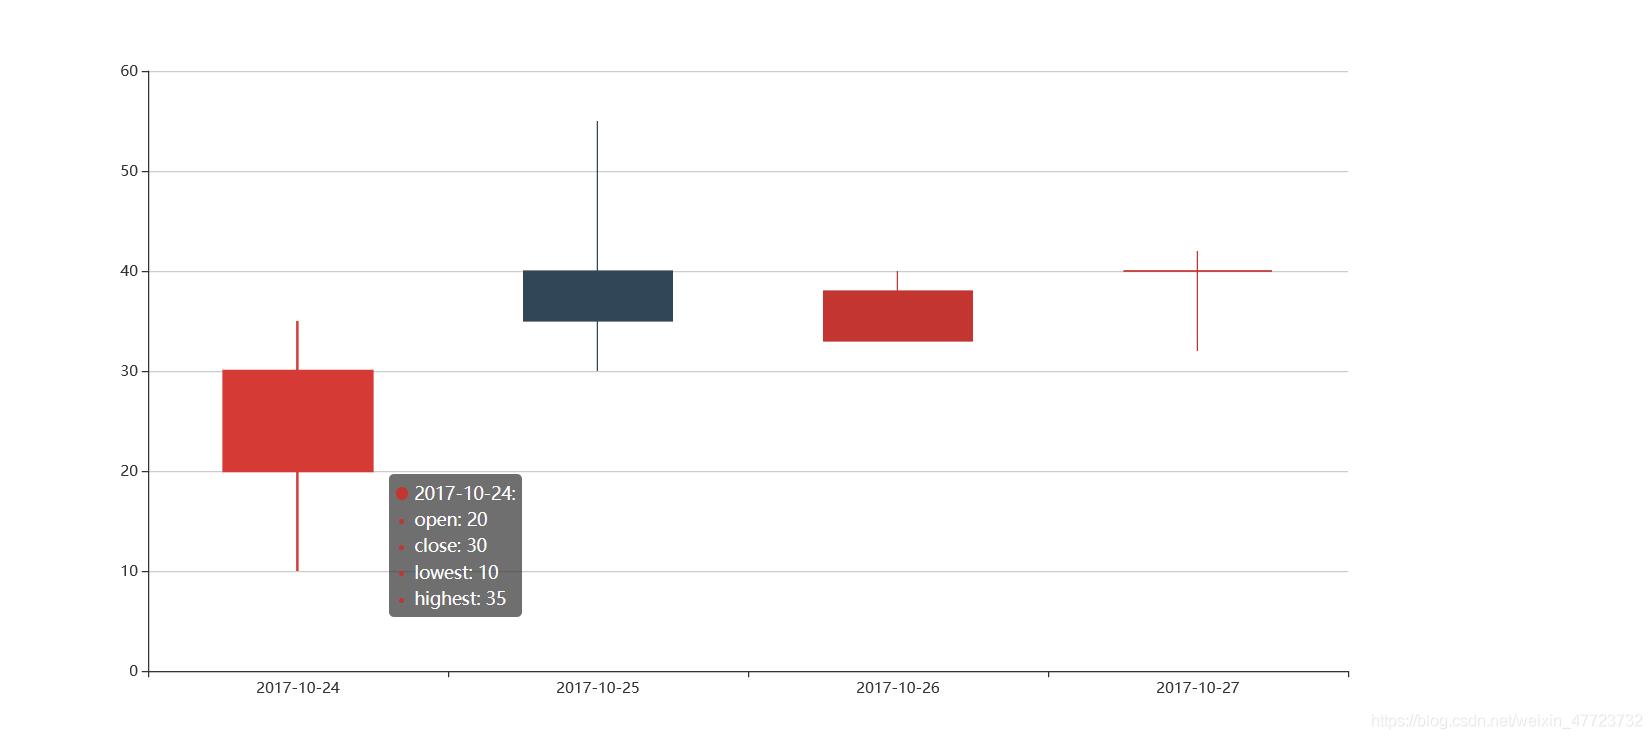
K线图鼠标缩放
大量的数据集的时候,我们不可以全部同时展示,我们可以缩放来进行定向展示。
from pyecharts import options as opts
from pyecharts.charts import Kline

data = [
 [2320.26, 2320.26, 2287.3, 2362.94],
 [2300, 2291.3, 2288.26, 2308.38],
 [2295.35, 2346.5, 2295.35, 2345.92],
 [2347.22, 2358.98, 2337.35, 2363.8],
 [2360.75, 2382.48, 2347.89, 2383.76],
 [2383.43, 2385.42, 2371.23, 2391.82],
 [2377.41, 2419.02, 2369.57, 2421.15],
 [2425.92, 2428.15, 2417.58, 2440.38],
 [2411, 2433.13, 2403.3, 2437.42],
 [2432.68, 2334.48, 2427.7, 2441.73],
 [2430.69, 2418.53, 2394.22, 2433.89],
 [2416.62, 2432.4, 2414.4, 2443.03],
 [2441.91, 2421.56, 2418.43, 2444.8],
 [2420.26, 2382.91, 2373.53, 2427.07],
 [2383.49, 2397.18, 2370.61, 2397.94],
 [2378.82, 2325.95, 2309.17, 2378.82],
 [2322.94, 2314.16, 2308.76, 2330.88],
 [2320.62, 2325.82, 2315.01, 2338.78],
 [2313.74, 2293.34, 2289.89, 2340.71],
 [2297.77, 2313.22, 2292.03, 2324.63],
 [2322.32, 2365.59, 2308.92, 2366.16],
 [2364.54, 2359.51, 2330.86, 2369.65],
 [2332.08, 2273.4, 2259.25, 2333.54],
 [2274.81, 2326.31, 2270.1, 2328.14],
 [2333.61, 2347.18, 2321.6, 2351.44],
 [2340.44, 2324.29, 2304.27, 2352.02],
 [2326.42, 2318.61, 2314.59, 2333.67],
 [2314.68, 2310.59, 2296.58, 2320.96],
 [2309.16, 2286.6, 2264.83, 2333.29],
 [2282.17, 2263.97, 2253.25, 2286.33],
 [2255.77, 2270.28, 2253.31, 2276.22],
]


c = (
 Kline()
 .add_xaxis(["2017/7/{}".format(i + 1) for i in range(31)])
 .add_yaxis(
  "kline",
  data,
  itemstyle_opts=opts.ItemStyleOpts(
   color="#ec0000",
   color0="#00da3c",
   border_color="#8A0000",
   border_color0="#008F28",
  ),
 )
 .set_global_opts(
  xaxis_opts=opts.AxisOpts(is_scale=True),
  yaxis_opts=opts.AxisOpts(
   is_scale=True,
   splitarea_opts=opts.SplitAreaOpts(
    is_show=True, areastyle_opts=opts.AreaStyleOpts(opacity=1)
   ),
  ),
  datazoom_opts=[opts.DataZoomOpts(type_="inside")],
  title_opts=opts.TitleOpts(title="Kline-ItemStyle"),
 )
 .render("K线图鼠标缩放.html")
)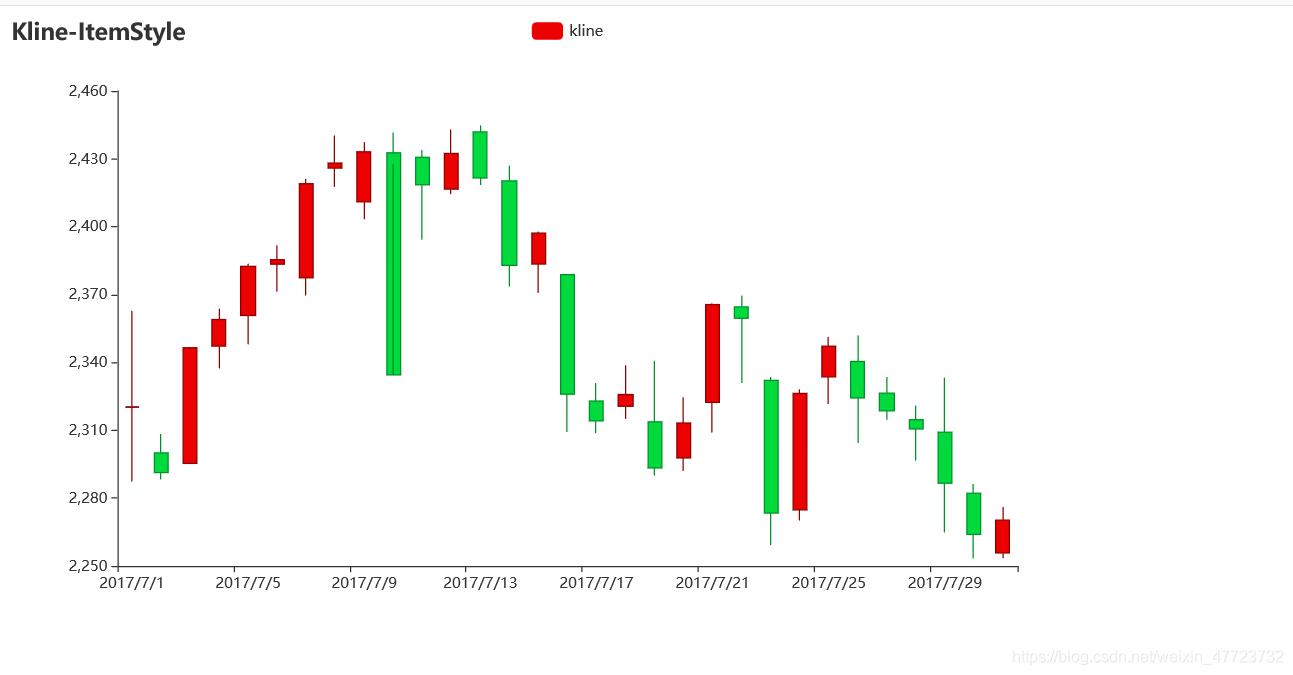
有刻度标签的K线图
我们知道一个数据节点,但是我们不能在图像里面一眼看出有哪些数据量超出了它的范围,刻度标签就可以派上用场了。
from pyecharts import options as opts
from pyecharts.charts import Kline

data = [
 [2320.26, 2320.26, 2287.3, 2362.94],
 [2300, 2291.3, 2288.26, 2308.38],
 [2295.35, 2346.5, 2295.35, 2345.92],
 [2347.22, 2358.98, 2337.35, 2363.8],
 [2360.75, 2382.48, 2347.89, 2383.76],
 [2383.43, 2385.42, 2371.23, 2391.82],
 [2377.41, 2419.02, 2369.57, 2421.15],
 [2425.92, 2428.15, 2417.58, 2440.38],
 [2411, 2433.13, 2403.3, 2437.42],
 [2432.68, 2334.48, 2427.7, 2441.73],
 [2430.69, 2418.53, 2394.22, 2433.89],
 [2416.62, 2432.4, 2414.4, 2443.03],
 [2441.91, 2421.56, 2418.43, 2444.8],
 [2420.26, 2382.91, 2373.53, 2427.07],
 [2383.49, 2397.18, 2370.61, 2397.94],
 [2378.82, 2325.95, 2309.17, 2378.82],
 [2322.94, 2314.16, 2308.76, 2330.88],
 [2320.62, 2325.82, 2315.01, 2338.78],
 [2313.74, 2293.34, 2289.89, 2340.71],
 [2297.77, 2313.22, 2292.03, 2324.63],
 [2322.32, 2365.59, 2308.92, 2366.16],
 [2364.54, 2359.51, 2330.86, 2369.65],
 [2332.08, 2273.4, 2259.25, 2333.54],
 [2274.81, 2326.31, 2270.1, 2328.14],
 [2333.61, 2347.18, 2321.6, 2351.44],
 [2340.44, 2324.29, 2304.27, 2352.02],
 [2326.42, 2318.61, 2314.59, 2333.67],
 [2314.68, 2310.59, 2296.58, 2320.96],
 [2309.16, 2286.6, 2264.83, 2333.29],
 [2282.17, 2263.97, 2253.25, 2286.33],
 [2255.77, 2270.28, 2253.31, 2276.22],
]

c = (
 Kline()
 .add_xaxis(["2017/7/{}".format(i + 1) for i in range(31)])
 .add_yaxis(
  "kline",
  data,
  markline_opts=opts.MarkLineOpts(
   data=[opts.MarkLineItem(type_="max", value_dim="close")]
  ),
 )
 .set_global_opts(
  xaxis_opts=opts.AxisOpts(is_scale=True),
  yaxis_opts=opts.AxisOpts(
   is_scale=True,
   splitarea_opts=opts.SplitAreaOpts(
    is_show=True, areastyle_opts=opts.AreaStyleOpts(opacity=1)
   ),
  ),
  title_opts=opts.TitleOpts(title="标题"),
 )
 .render("刻度标签.html")
)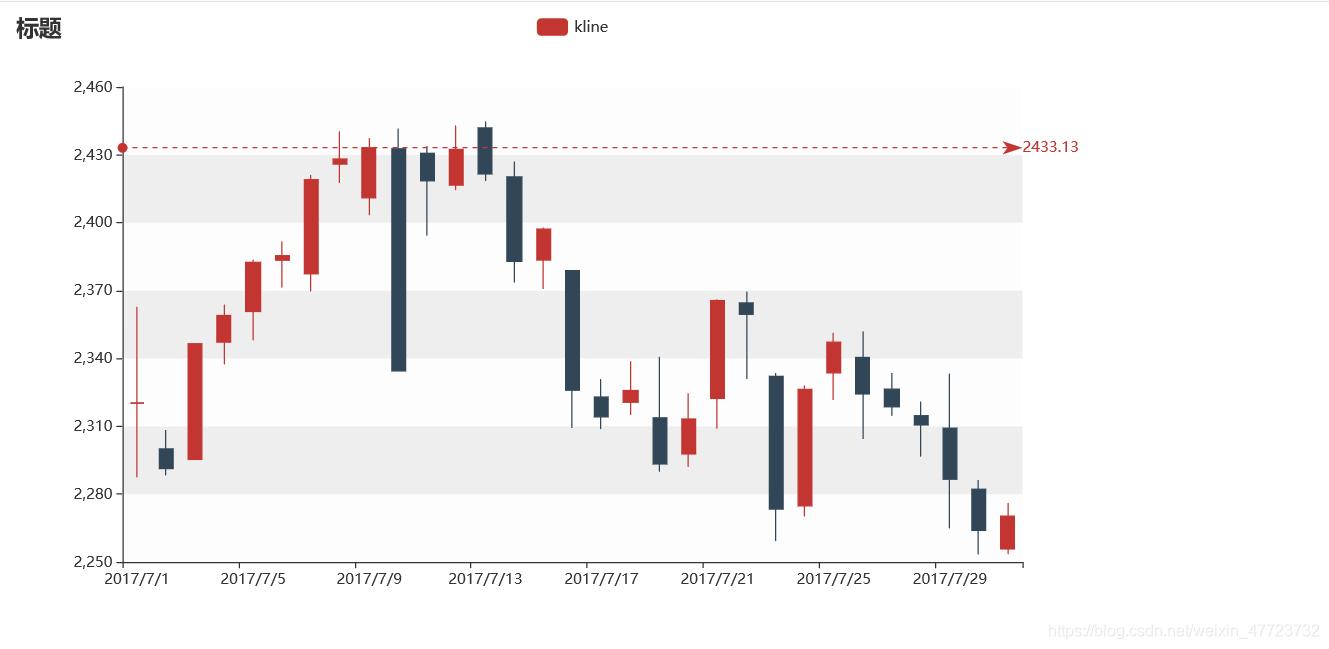
K线图鼠标无缩放
前面的是一个有缩放功能的图例代码,但是有时候我们不想要那么修改一下参数就可以了。
from pyecharts import options as opts
from pyecharts.charts import Kline

data = [
 [2320.26, 2320.26, 2287.3, 2362.94],
 [2300, 2291.3, 2288.26, 2308.38],
 [2295.35, 2346.5, 2295.35, 2345.92],
 [2347.22, 2358.98, 2337.35, 2363.8],
 [2360.75, 2382.48, 2347.89, 2383.76],
 [2383.43, 2385.42, 2371.23, 2391.82],
 [2377.41, 2419.02, 2369.57, 2421.15],
 [2425.92, 2428.15, 2417.58, 2440.38],
 [2411, 2433.13, 2403.3, 2437.42],
 [2432.68, 2334.48, 2427.7, 2441.73],
 [2430.69, 2418.53, 2394.22, 2433.89],
 [2416.62, 2432.4, 2414.4, 2443.03],
 [2441.91, 2421.56, 2418.43, 2444.8],
 [2420.26, 2382.91, 2373.53, 2427.07],
 [2383.49, 2397.18, 2370.61, 2397.94],
 [2378.82, 2325.95, 2309.17, 2378.82],
 [2322.94, 2314.16, 2308.76, 2330.88],
 [2320.62, 2325.82, 2315.01, 2338.78],
 [2313.74, 2293.34, 2289.89, 2340.71],
 [2297.77, 2313.22, 2292.03, 2324.63],
 [2322.32, 2365.59, 2308.92, 2366.16],
 [2364.54, 2359.51, 2330.86, 2369.65],
 [2332.08, 2273.4, 2259.25, 2333.54],
 [2274.81, 2326.31, 2270.1, 2328.14],
 [2333.61, 2347.18, 2321.6, 2351.44],
 [2340.44, 2324.29, 2304.27, 2352.02],
 [2326.42, 2318.61, 2314.59, 2333.67],
 [2314.68, 2310.59, 2296.58, 2320.96],
 [2309.16, 2286.6, 2264.83, 2333.29],
 [2282.17, 2263.97, 2253.25, 2286.33],
 [2255.77, 2270.28, 2253.31, 2276.22],
]


c = (
 Kline()
 .add_xaxis(["2017/7/{}".format(i + 1) for i in range(31)])
 .add_yaxis("kline", data)
 .set_global_opts(
  yaxis_opts=opts.AxisOpts(is_scale=True),
  xaxis_opts=opts.AxisOpts(is_scale=True),
  title_opts=opts.TitleOpts(title="Kline-基本示例"),
 )
 .render("鼠标无缩放.html")
)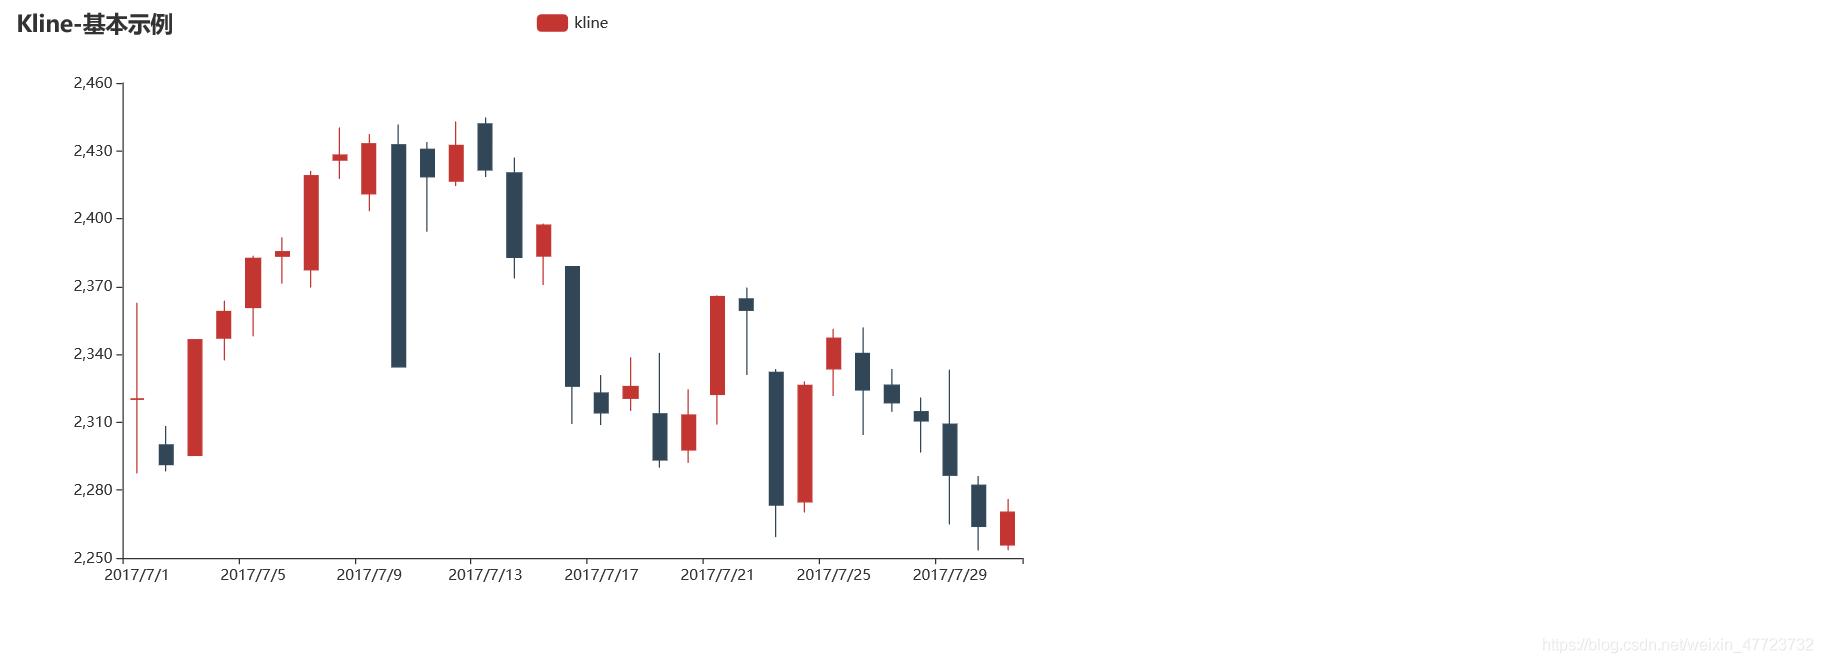
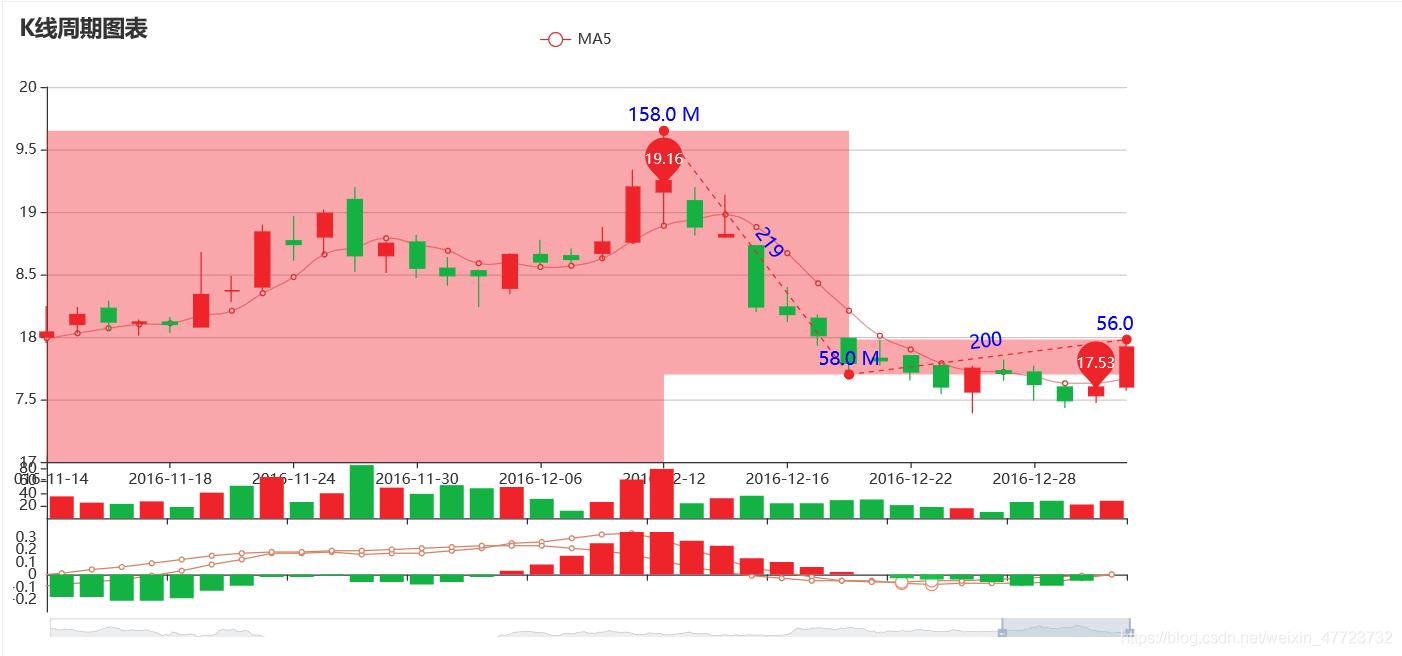
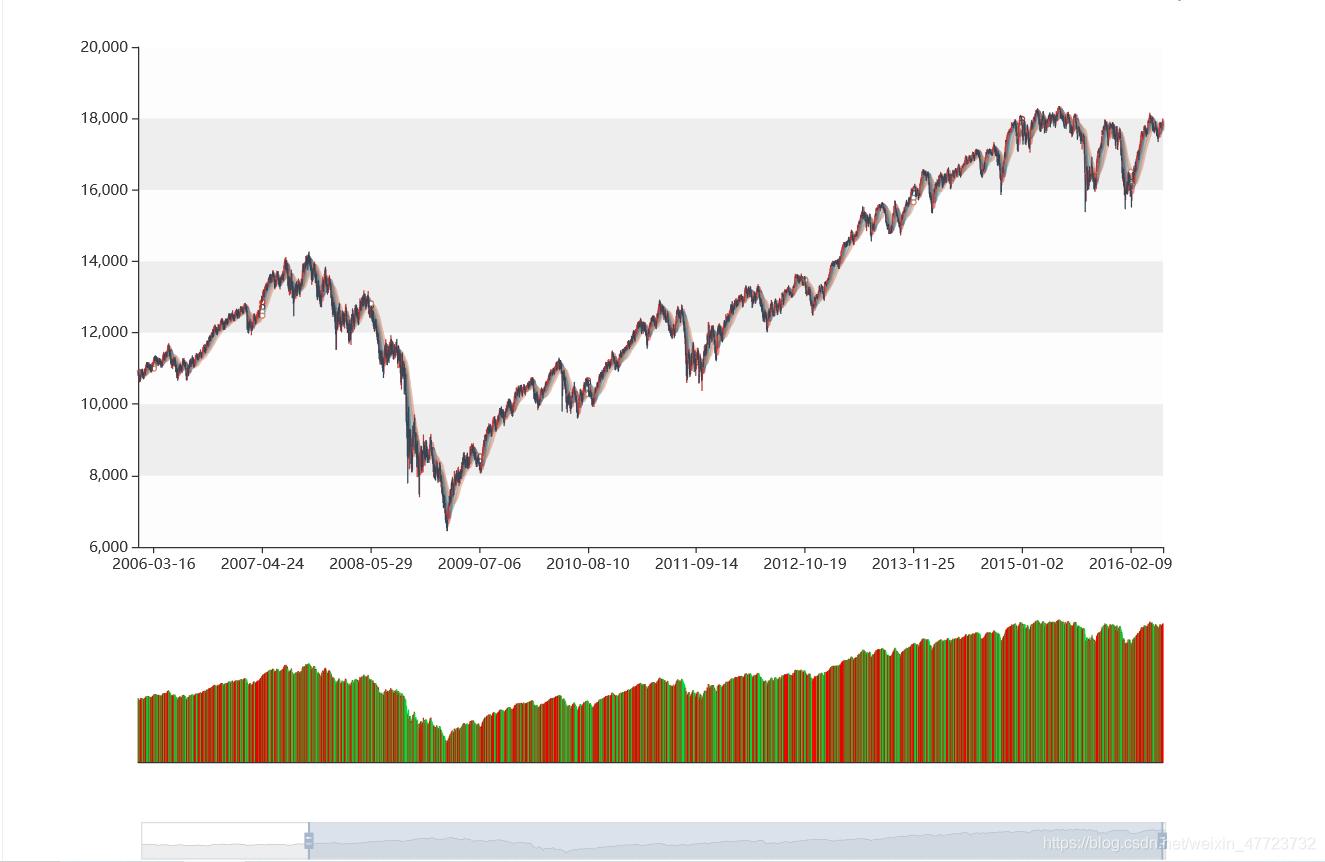
大量数据K线图绘制(X轴鼠标可移动)
虽然有时候缩放可以容纳较多的数据量,但是还是不够智能,可以利用这个
from pyecharts import options as opts
from pyecharts.charts import Kline

data = [
 [2320.26, 2320.26, 2287.3, 2362.94],
 [2300, 2291.3, 2288.26, 2308.38],
 [2295.35, 2346.5, 2295.35, 2345.92],
 [2347.22, 2358.98, 2337.35, 2363.8],
 [2360.75, 2382.48, 2347.89, 2383.76],
 [2383.43, 2385.42, 2371.23, 2391.82],
 [2377.41, 2419.02, 2369.57, 2421.15],
 [2425.92, 2428.15, 2417.58, 2440.38],
 [2411, 2433.13, 2403.3, 2437.42],
 [2432.68, 2334.48, 2427.7, 2441.73],
 [2430.69, 2418.53, 2394.22, 2433.89],
 [2416.62, 2432.4, 2414.4, 2443.03],
 [2441.91, 2421.56, 2418.43, 2444.8],
 [2420.26, 2382.91, 2373.53, 2427.07],
 [2383.49, 2397.18, 2370.61, 2397.94],
 [2378.82, 2325.95, 2309.17, 2378.82],
 [2322.94, 2314.16, 2308.76, 2330.88],
 [2320.62, 2325.82, 2315.01, 2338.78],
 [2313.74, 2293.34, 2289.89, 2340.71],
 [2297.77, 2313.22, 2292.03, 2324.63],
 [2322.32, 2365.59, 2308.92, 2366.16],
 [2364.54, 2359.51, 2330.86, 2369.65],
 [2332.08, 2273.4, 2259.25, 2333.54],
 [2274.81, 2326.31, 2270.1, 2328.14],
 [2333.61, 2347.18, 2321.6, 2351.44],
 [2340.44, 2324.29, 2304.27, 2352.02],
 [2326.42, 2318.61, 2314.59, 2333.67],
 [2314.68, 2310.59, 2296.58, 2320.96],
 [2309.16, 2286.6, 2264.83, 2333.29],
 [2282.17, 2263.97, 2253.25, 2286.33],
 [2255.77, 2270.28, 2253.31, 2276.22],
]

c = (
 Kline()
 .add_xaxis(["2017/7/{}".format(i + 1) for i in range(31)])
 .add_yaxis("kline", data)
 .set_global_opts(
  xaxis_opts=opts.AxisOpts(is_scale=True),
  yaxis_opts=opts.AxisOpts(
   is_scale=True,
   splitarea_opts=opts.SplitAreaOpts(
    is_show=True, areastyle_opts=opts.AreaStyleOpts(opacity=1)
   ),
  ),
  datazoom_opts=[opts.DataZoomOpts(pos_bottom="-2%")],
  title_opts=opts.TitleOpts(title="Kline-DataZoom-slider-Position"),
 )
 .render("大量数据展示.html")
)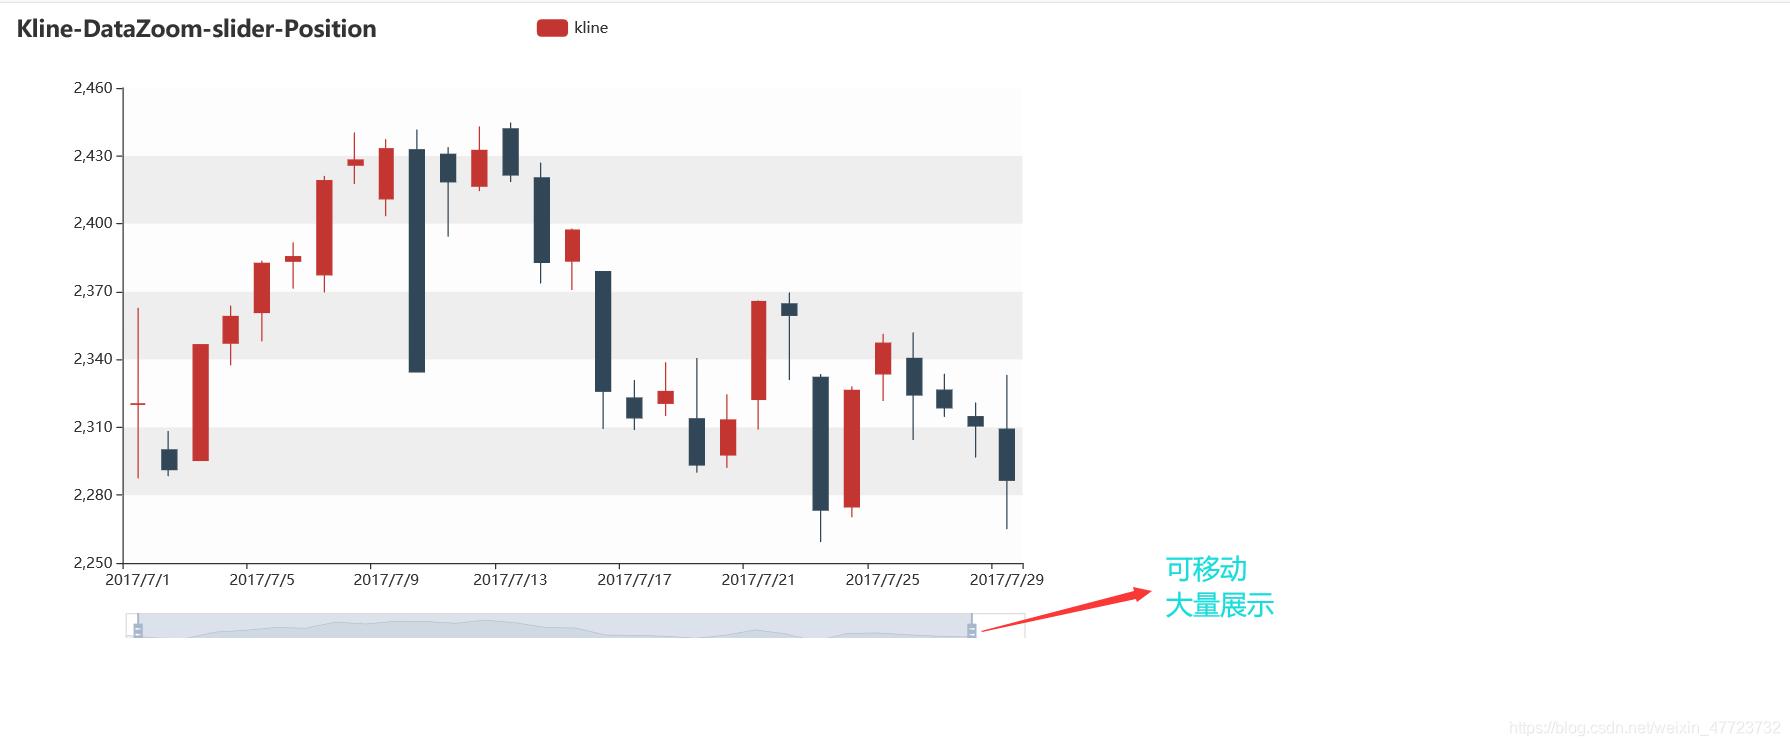
K线图的绘制需要有专业的基本知识哟,不然可能有点恼火了。
到此这篇关于Python绘制K线图之可视化神器pyecharts的使用的文章就介绍到这了,更多相关Python绘制K线图内容请搜索python博客以前的文章或继续浏览下面的相关文章希望大家以后多多支持python博客!
-
<< 上一篇 下一篇 >>
标签:numpy matplotlib
Python绘制K线图之可视化神器pyecharts的使用
看: 1741次 时间:2021-03-11 分类 : python教程
- 相关文章
- 2021-12-20Python 实现图片色彩转换案例
- 2021-12-20python初学定义函数
- 2021-12-20图文详解Python如何导入自己编写的py文件
- 2021-12-20python二分法查找实例代码
- 2021-12-20Pyinstaller打包工具的使用以及避坑
- 2021-12-20Facebook开源一站式服务python时序利器Kats详解
- 2021-12-20pyCaret效率倍增开源低代码的python机器学习工具
- 2021-12-20python机器学习使数据更鲜活的可视化工具Pandas_Alive
- 2021-12-20python读写文件with open的介绍
- 2021-12-20Python生成任意波形并存为txt的实现
-
搜索
-
-
推荐资源
-
Powered By python教程网 鲁ICP备18013710号
python博客 - 小白学python最友好的网站!