应朋友需要,想将某客户的数据从某站里导出,先去某站搞个账号,建几条数据观察一番,心里有底后开搞。
1.Python环境搭建
之前电脑有安装过PyCharm Community 2019.1,具体安装过程就不写了,先跑个HelloWorld,输出正常后正式开整。
2.利用抓包工具或者Google浏览器调试模式拿到请求参数
Cookies参数如下:
cookies = {
    'JSESSIONID': 'XXX',
    'phone': 'XXX',
    'password': 'XXX',
    'isAuto': '0',    '
    loginAccess': 'XXX'
}
headers请求头信息构造:
headers = {
'Connection': 'keep-alive',
'sec-ch-ua': '"Google Chrome";v="89", "Chromium";v="89", ";Not A Brand";v="99"',
'Accept': 'application/json, text/javascript, */*; q=0.01',    'X-Requested-With': 'XMLHttpRequest',    'sec-ch-ua-mobile': '?0',
'User-Agent': 'Mozilla/5.0 (Windows NT 10.0; Win64; x64)
AppleWebKit/537.36 (KHTML, like Gecko) Chrome/89.0.4389.90
Safari/537.36',
'Content-Type': 'application/json',
'Sec-Fetch-Site': 'same-origin',
'Sec-Fetch-Mode': 'cors',
'Sec-Fetch-Dest': 'empty',
'Referer': 'https://xxx.xxx.xxx',
'Accept-Language': 'zh-CN,zh;q=0.9',}
请求路径:
params = ( ('method', 'getGoodsList'))请求参数组装:
data = '{
"pageSize":1000,
"pageNumber":1,
"searchText":"",
"sortOrder":"asc",
"isAdvancedSearch":false}'
pageSize:每页数据数量
pageNumber:页码
searchText:搜索条件
sortOrder:排序3.利用Requests模拟请求并获取数据
response = requests.post(
   'https://xxx.xxx.xxx',
    headers=headers,
    params=params,
    cookies=cookies,
    data=data
)
print(response.text.encode('utf8'))
res = json.loads(response.text)
4.创建Excel表格
t = time.time()
randStr = int(round(t * 1000))
tSheetName = "a_" + str(randStr) + ".xlsx"
workbook = xlsxwriter.Workbook(tSheetName)
worksheet = workbook.add_worksheet()
5.表头及数据组装
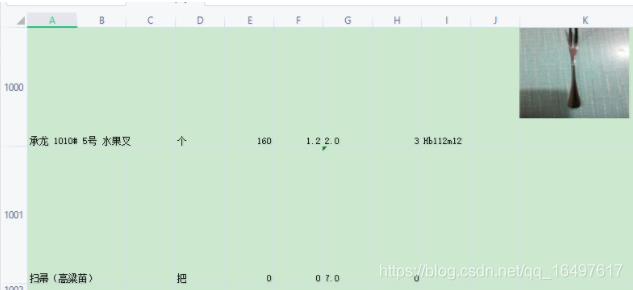
cursor = 0
picurl = ''
writeExcel(row=cursor)
for obj in res["rows"]:
    cursor += 1
    picurl = ''
    if obj['ImageKID']:
        picurl = 'https://xxx.xxx.xxx? imageKid='+obj['ImageKID']
    writeExcel(row=cursor,Description=obj['Description'], Category=obj['Category'],    Series=obj['Series'],BaseUnit=obj['BaseUnit'],Qty=obj['Qty'],
    CostPrice=obj['CostPrice'],SalePrice=obj['SalePrice'],
   RetailPrice=obj['RetailPrice'],Barcode=obj['Barcode'],
   Remark=obj['Remark'], ImageKID=picurl)
6.将数据写入Excel表格中
def writeExcel(row=0, Description='', Category='', Series='', BaseUnit='', Qty='', CostPrice='', SalePrice='', RetailPrice='', Barcode='', Remark='',ImageKID=''):
if row == 0:
worksheet.write(row, 0, '名称')
worksheet.write(row, 1, '货号')
worksheet.write(row, 2, '规格')
worksheet.write(row, 3, '单位')
worksheet.write(row, 4, '库存')
worksheet.write(row, 5, '成本')
worksheet.write(row, 6, '批发价')
worksheet.write(row, 7, '零售价')
worksheet.write(row, 8, '条码')
worksheet.write(row, 9, '备注')
worksheet.write(row, 10, '图片')
else:
    if ImageKID!='':
        image_data = io.BytesIO(urllib.urlopen(ImageKID).read())
        worksheet.insert_image(row, 10, ImageKID, {'image_data': image_data})
worksheet.write(row, 0, Description)
worksheet.write(row, 1, Category)
worksheet.write(row, 2, Series)
worksheet.write(row, 3, BaseUnit)
worksheet.write(row, 4, Qty)
worksheet.write(row, 5, CostPrice)
worksheet.write(row, 6, SalePrice)
worksheet.write(row, 7, RetailPrice)
worksheet.write(row, 8, Barcode)
worksheet.write(row, 9, Remark)
worksheet.set_column(10, 10, 23)
worksheet.set_row(row, 150)
注意图片路径不存在的情况,否则会执行异常
write方法:
    def write(self, row, col, *args):
        """
        Write data to a worksheet cell by calling the appropriate write_*()
        method based on the type of data being passed.

        Args:
            row:   The cell row (zero indexed).
            col:   The cell column (zero indexed).
            *args: Args to pass to sub functions.

        Returns:
             0:    Success.
            -1:    Row or column is out of worksheet bounds.
            other: Return value of called method.

        """
        return self._write(row, col, *args)
通过set_row方法设置表格行高
    def set_row(self, row, height=None, cell_format=None, options=None):
        """
        Set the width, and other properties of a row.

        Args:
            row:         Row number (zero-indexed).
            height:      Row height. (optional).
            cell_format: Row cell_format. (optional).
            options:     Dict of options such as hidden, level and collapsed.

        Returns:
            0:  Success.
            -1: Row number is out of worksheet bounds.
......
        """
通过set_column方法设置图片列宽度:
    def set_column(self, first_col, last_col, width=None, cell_format=None,
                   options=None):
        """
        Set the width, and other properties of a single column or a
        range of columns.

        Args:
            first_col:   First column (zero-indexed).
            last_col:    Last column (zero-indexed). Can be same as first_col.
            width:       Column width. (optional).
            cell_format: Column cell_format. (optional).
            options:     Dict of options such as hidden and level.

        Returns:
            0:  Success.
            -1: Column number is out of worksheet bounds.
      ......

        """
通过insert_image插入网络图片:
    def insert_image(self, row, col, filename, options=None):
        """
        Insert an image with its top-left corner in a worksheet cell.

        Args:
            row:      The cell row (zero indexed).
            col:      The cell column (zero indexed).
            filename: Path and filename for image in PNG, JPG or BMP format.
            options:  Position, scale, url and data stream of the image.

        Returns:
            0:  Success.
            -1: Row or column is out of worksheet bounds.

        """
        # Check insert (row, col) without storing.
        if self._check_dimensions(row, col, True, True):
            warn('Cannot insert image at (%d, %d).' % (row, col))
            return -1

        if options is None:
            options = {}

        x_offset = options.get('x_offset', 0)
        y_offset = options.get('y_offset', 0)
        x_scale = options.get('x_scale', 1)
        y_scale = options.get('y_scale', 1)
        url = options.get('url', None)
        tip = options.get('tip', None)
        anchor = options.get('object_position', 2)
        image_data = options.get('image_data', None)
        description = options.get('description', None)
        decorative = options.get('decorative', False)

        # For backward compatibility with older parameter name.
        anchor = options.get('positioning', anchor)

        if not image_data and not os.path.exists(filename):
            warn("Image file '%s' not found." % force_unicode(filename))
            return -1

        self.images.append([row, col, filename, x_offset, y_offset,
                            x_scale, y_scale, url, tip, anchor, image_data,
                            description, decorative])
        return 0
注意insert_image(row, colunmNum, ‘xx.png', {‘url': xxx})并不能插入网络图片,只是给本地图片一个url路径
7.关闭表格
workbook.close()8.附引入的包
# -*- coding: UTF-8 -*-
# 批量获取XX数据
import io
import json
import requests
import sys
import xlsxwriter
import time
import urllib
9.代码跑起来
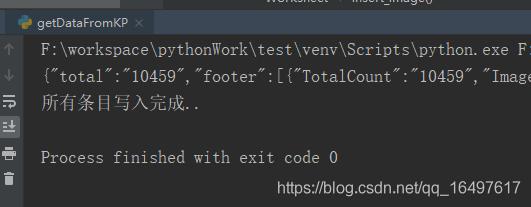
在看下Excel表格中导出的信息
到此这篇关于Python中Cookies导出某站用户数据的方法的文章就介绍到这了,更多相关Python Cookies导出数据内容请搜索python博客以前的文章或继续浏览下面的相关文章希望大家以后多多支持python博客!
- << 上一篇 下一篇 >>
Python中Cookies导出某站用户数据的方法
看: 3754次 时间:2021-07-24 分类 : python教程
- 相关文章
- 2021-12-20Python 实现图片色彩转换案例
- 2021-12-20python初学定义函数
- 2021-12-20图文详解Python如何导入自己编写的py文件
- 2021-12-20python二分法查找实例代码
- 2021-12-20Pyinstaller打包工具的使用以及避坑
- 2021-12-20Facebook开源一站式服务python时序利器Kats详解
- 2021-12-20pyCaret效率倍增开源低代码的python机器学习工具
- 2021-12-20python机器学习使数据更鲜活的可视化工具Pandas_Alive
- 2021-12-20python读写文件with open的介绍
- 2021-12-20Python生成任意波形并存为txt的实现
-
搜索
-
-
推荐资源
-
Powered By python教程网 鲁ICP备18013710号
python博客 - 小白学python最友好的网站!