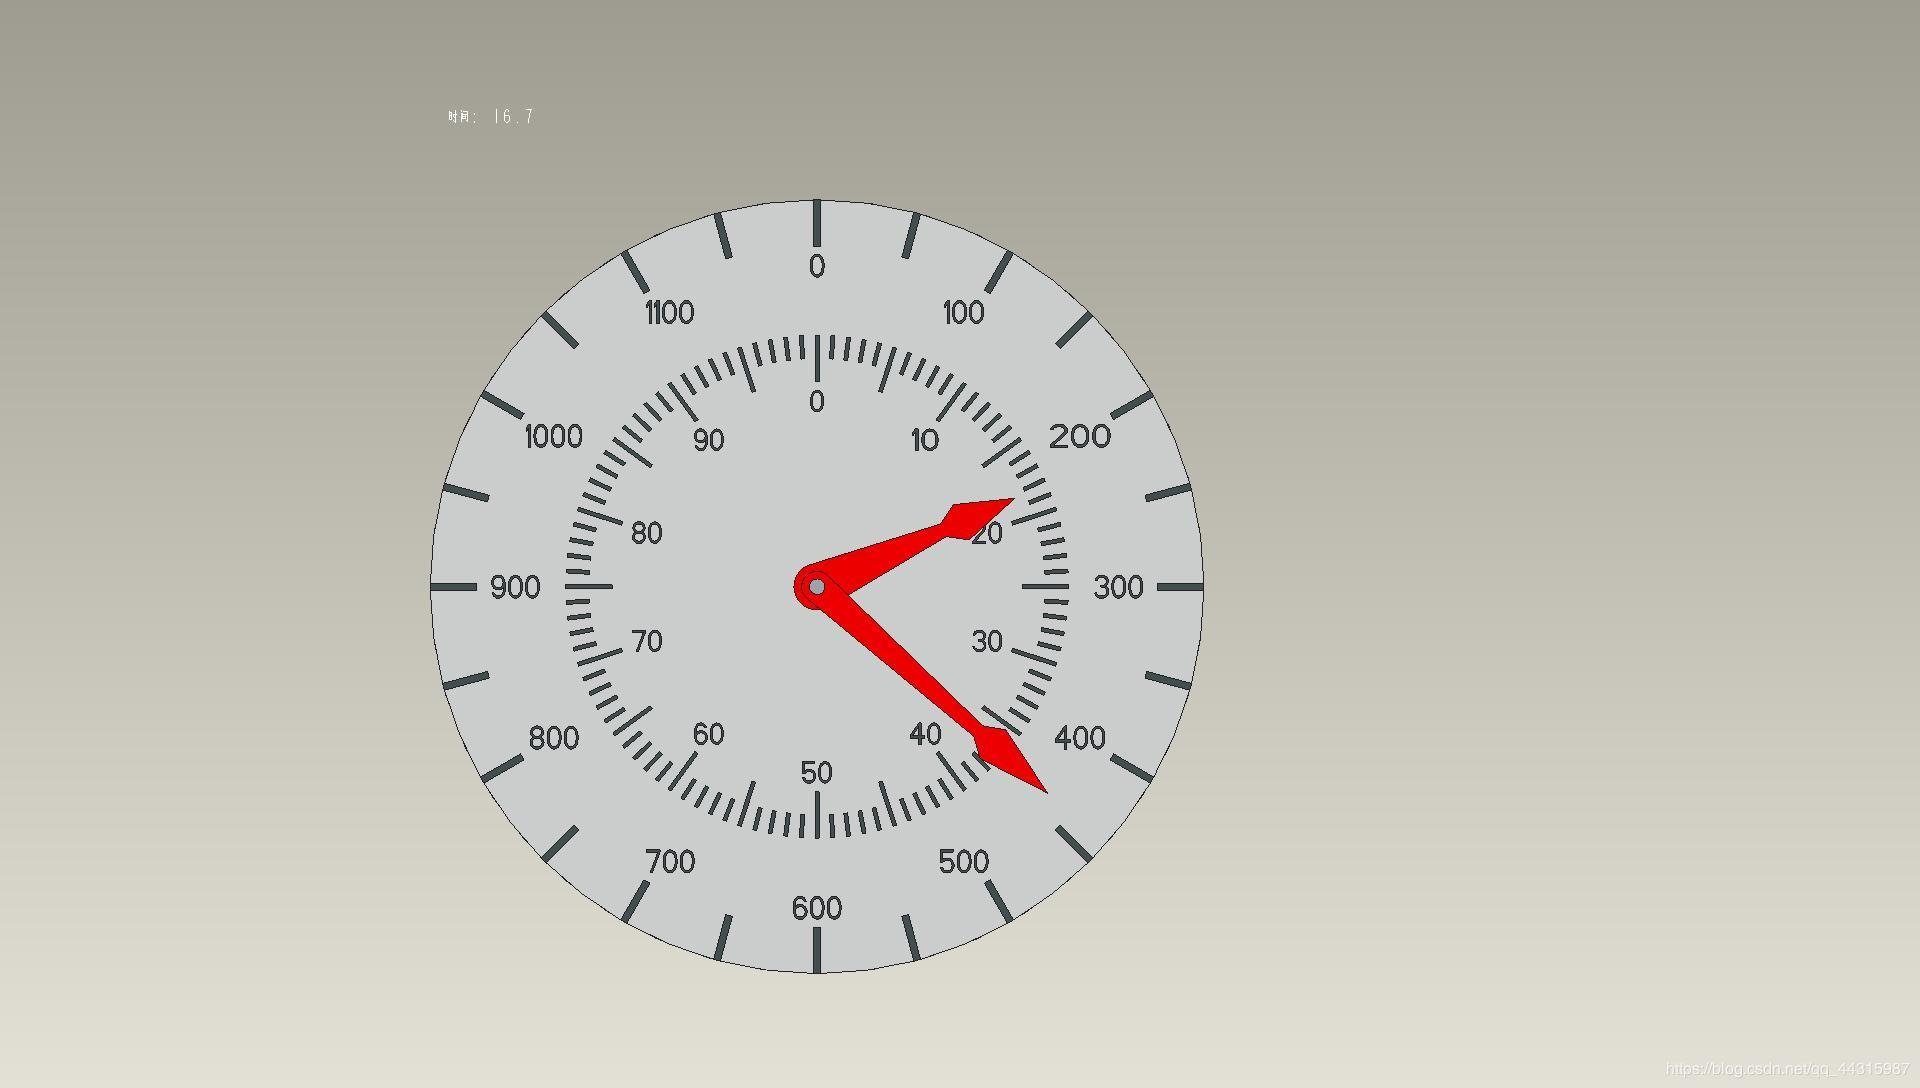
前段时间参加了一个表盘指针读数的比赛,今天来总结一下
数据集一共有一千张图片:
方法一:径向灰度求和
基本原理:
将图像以表盘圆心转换成极坐标,然后通过矩阵按行求和找到二值图最大值即为指针尖端
导入需要用到的包
import cv2 as cv
import numpy as np
import math
from matplotlib import pyplot as plt
import os
图像预处理
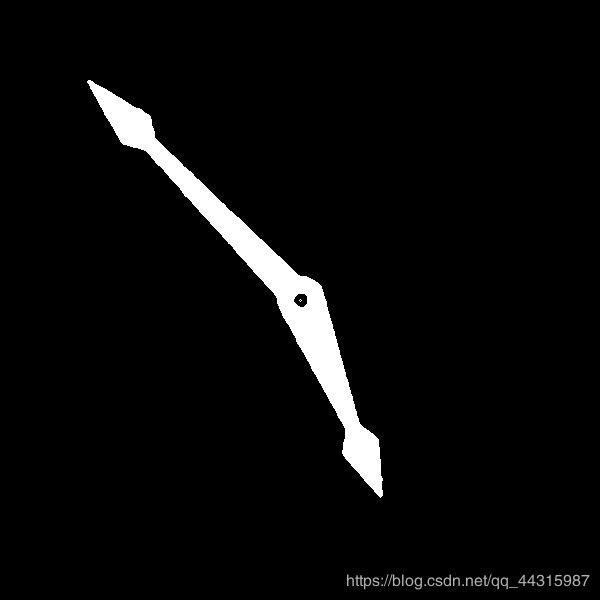
去除背景:利用提取红色实现
def extract_red(image):
  """
  通过红色过滤提取出指针
  """
  red_lower1 = np.array([0, 43, 46])
  red_upper1 = np.array([10, 255, 255])
  red_lower2 = np.array([156, 43, 46])
  red_upper2 = np.array([180, 255, 255])
  dst = cv.cvtColor(image, cv.COLOR_BGR2HSV)
  mask1 = cv.inRange(dst, lowerb=red_lower1, upperb=red_upper1)
  mask2 = cv.inRange(dst, lowerb=red_lower2, upperb=red_upper2)
  mask = cv.add(mask1, mask2)
  return mask
获得钟表中心:轮廓查找,取出轮廓的外接矩形,根据矩形面积找出圆心
def get_center(image):
  """
  获取钟表中心
  """
  edg_output = cv.Canny(image, 100, 150, 2) # canny算子提取边缘
  cv.imshow('dsd', edg_output)
  # 获取图片轮廓
  contours, hireachy = cv.findContours(edg_output, cv.RETR_TREE, cv.CHAIN_APPROX_SIMPLE)
  center = []
  cut=[0, 0]
  for i, contour in enumerate(contours):
    x, y, w, h = cv.boundingRect(contour) # 外接矩形
    area = w * h # 面积
    if area < 100 or area > 4000:
      continue
    cv.rectangle(image, (x, y), (x + w, y + h), (255, 0, 0), 1)
    cx = w / 2
    cy = h / 2
    cv.circle(image, (np.int(x + cx), np.int(y + cy)), 1, (255, 0, 0)) ## 在图上标出圆心
    center = [np.int(x + cx), np.int(y + cy)]
    break
  return center[::-1]
由上面的图像可以看出,圆心定位还是非常准确的
图片裁剪
def ChangeImage(image):
  """
  图像裁剪
  """
  # 指针提取
  mask = extract_red(image)
  mask = cv.medianBlur(mask,ksize=5)#去噪
  # 获取中心
  center = get_center(mask)
  # 去除多余黑色边框
  [y, x] = center
  cut = mask[y-300:y+300, x-300:x+300]
  # 因为mask处理后已经是二值图像,故不用转化为灰度图像
  return cut
剪裁后的图像如下图所示:
极坐标转换
注意:需要将图片裁剪成正方形
def polar(image):
  """
  转换成极坐标
  """
  x, y = 300, 300
  maxRadius = 300*math.sqrt(2)
  linear_polar = cv.linearPolar(image, (y, x), maxRadius, cv.WARP_FILL_OUTLIERS + cv.INTER_LINEAR)
  mypolar = linear_polar.copy()
  #将图片调整为从0度开始
  mypolar[:150, :] = linear_polar[450:, :]
  mypolar[150:, :] = linear_polar[:450, :]
  cv.imshow("linear_polar", linear_polar)
  cv.imshow("mypolar", mypolar)
  return mypolar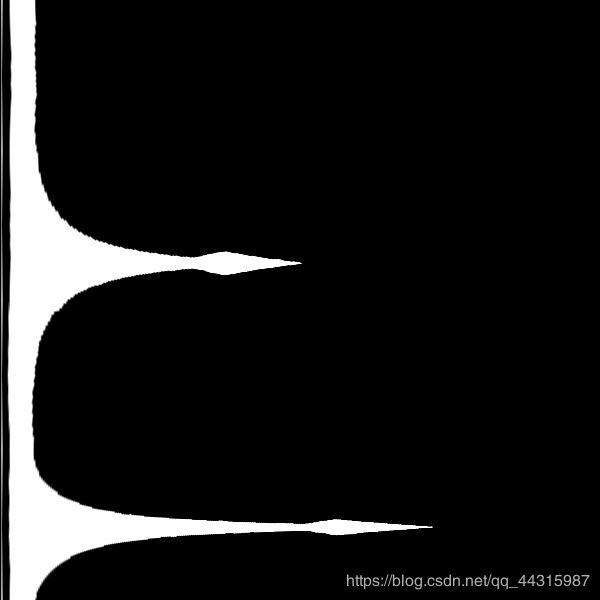
由图像就可以很容易发现指针的顶点
计算角度
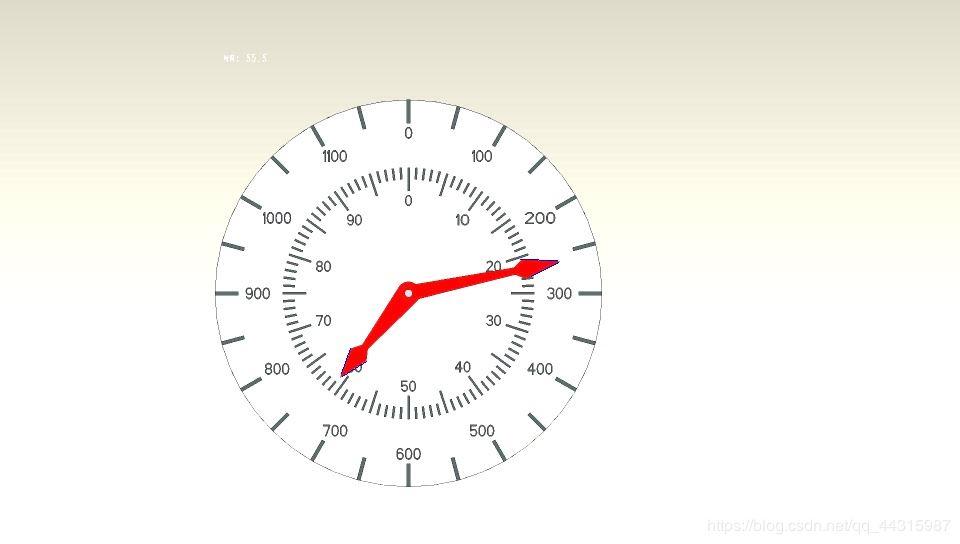
def Get_Reading(sumdata):
  """
  读数并输出
  """
  peak = []
  # s记录遍历时波是否在上升
  s = sumdata[0] < sumdata[1]
  for i in range(599):
    # 上升阶段
    if s==True and sumdata[i] > sumdata[i+1] and sumdata[i] > 70000:
      peak.append(sumdata[i])
      s=False
    # 下降阶段
    if s==False and sumdata[i] < sumdata[i+1]:
      s=True
  peak.sort()
  a = sumdata[0]
  b = sumdata[-1]
  if not peak or max(a,b) > peak[-1]:
    peak.append(max(a,b))
  longindex = (sumdata.index(peak[-1]))%599
  longnum = (longindex + 1)//25*50
  # 先初始化和长的同一刻度
  #shortindex = longindex
  shortnum = round(longindex / 6)
  try:
    shortindex = sumdata.index(peak[-2])
    shortnum = round(shortindex / 6)
  except IndexError:
    i=0
    while i<300:
      i += 1
      l = sumdata[(longindex-i)%600]
      r = sumdata[(longindex+i)%600]
      possibleshort = max(l,r)
      # 在短指针可能范围内寻找插值符合条件的值
      if possibleshort > 80000:
        continue
      elif possibleshort < 60000:
        break
      else:
        if abs(l-r) > 17800:
          shortindex = sumdata.index(possibleshort) - 1
          shortnum = round(shortindex / 6)
          break
  return [longnum,shortnum%100]
def test(): """ RGS法测试 """ image = cv.imread("./BONC/1_{0:0>4d}".format(400) + ".jpg") newimg = ChangeImage(image) polarimg = polar(newimg) psum = polarimg.sum(axis=1, dtype = 'int32') result = Get_Reading(list(psum)) print(result)if __name__ == "__main__": test() k = cv.waitKey(0) if k == 27: cv.destroyAllWindows() elif k == ord('s'): cv.imwrite('new.jpg', src) cv.destroyAllWindows()[1050, 44]
方法二:Hough直线检测
原理:利用Hough变换检测出指针的两条边,从而两条边的中线角度即为指针刻度
数据预处理与上面的方法类似
可以看到分别检测出了两个指针的左右两条边,然后可以由这四个角度算出两个指针中线的角度,具体计算过程写的有点复杂
class Apparatus:
  def __init__(self, name):
    self.name = name
    self.angle = []
    self.src = cv.imread(name)


  def line_detect_possible_demo(self, image, center, tg):
    '''
    :param image: 二值图
    :param center: 圆心
    :param tg: 直线检测maxLineGap
    '''
    res = {} # 存放线段的斜率和信息
    edges = cv.Canny(image, 50, 150, apertureSize=7)
    cv.imshow("abcdefg", edges)
    lines = cv.HoughLinesP(edges, 1, np.pi/360, 13, minLineLength=20, maxLineGap=tg)
    for line in lines:
      x_1, y_1, x_2, y_2 = line[0]
      # 将坐标原点移动到圆心
      x1 = x_1 - center[0]
      y1 = center[1] - y_1
      x2 = x_2 - center[0]
      y2 = center[1] - y_2

      # 计算斜率
      if x2 - x1 == 0:
        k = float('inf')
      else:
        k = (y2-y1)/(x2-x1)
      d1 = np.sqrt(max(abs(x2), abs(x1)) ** 2 + (max(abs(y2), abs(y1))) ** 2) # 线段长度
      d2 = np.sqrt(min(abs(x2), abs(x1)) ** 2 + (min(abs(y2), abs(y1))) ** 2)
      # 将长指针与短指针做标记
      if d1 < 155 and d1 > 148 and d2 > 115:
        res[k] = [1]
      elif d1 < 110 and d1 > 100 and d2 > 75:
        res[k] = [2]
      else:
        continue
      res[k].append(1) if (x2 + x1) /2 > 0 else res[k].append(0) # 将14象限与23象限分离
      cv.line(self.src, (x1 + center[0], center[1] - y1), (x2 + center[0], center[1] - y2), (255, 0, 0), 1)
      cv.imshow("line_detect-posssible_demo", self.src)


      # 计算线段中点的梯度来判断是指针的左侧线段还是右侧线段
      middle_x = int((x_1 + x_2) / 2)
      middle_y = int((y_1 + y_2) / 2)
      grad_mat = image[middle_y-5:middle_y+6, middle_x-5:middle_x+6]
      cv.imshow("grad_mat", grad_mat)
      grad_x = cv.Sobel(grad_mat, cv.CV_32F, 1, 0)
      grad_y = cv.Sobel(grad_mat, cv.CV_32F, 0, 1)
      gradx = np.max(grad_x) if np.max(grad_x) != 0 else np.min(grad_x)
      grady = np.max(grad_y) if np.max(grad_y) != 0 else np.min(grad_y)
      if ((gradx >=0 and grady >= 0) or (gradx <= 0 and grady >= 0)) and res[k][1] == 1:
        res[k].append(1) # 右测
      elif ((gradx <= 0 and grady <= 0) or (gradx >= 0 and grady <= 0)) and res[k][1] == 0:
        res[k].append(1)
      else:
        res[k].append(0) # 左侧
    # 计算角度
    angle1 = [i for i in res if res[i][0] == 1]
    angle2 = [i for i in res if res[i][0] == 2]
    # 长指针
    a = np.arctan(angle1[0])
    b = np.arctan(angle1[1])
    if a * b < 0 and max(abs(a), abs(b)) > np.pi / 4:
      if a + b < 0:
        self.angle.append(math.degrees(-(a + b) / 2)) if res[angle1[1]][1] == 1 else self.angle.append(
          math.degrees(-(a + b) / 2) + 180)
      else:
        self.angle.append(math.degrees(np.pi - (a + b) / 2)) if res[angle1[1]][1] == 1 else self.angle.append(
          math.degrees(np.pi - (a + b) / 2) + 180)
    else:
      self.angle.append(math.degrees(np.pi / 2 - (a + b) / 2)) if res[angle1[1]][1] == 1 else self.angle.append(math.degrees(np.pi / 2 - (a + b) / 2) + 180)
    print('长指针读数:%f' % self.angle[0])


    # 短指针
    a = np.arctan(angle2[0])
    b = np.arctan(angle2[1])
    if a * b < 0 and max(abs(a), abs(b)) > np.pi / 4:
      if a + b < 0:
        self.angle.append(math.degrees(-(a + b) / 2)) if res[angle2[1]][1] == 1 else self.angle.append(
          math.degrees(-(a + b) / 2) + 180)
      else:
        self.angle.append(math.degrees(np.pi - (a + b) / 2)) if res[angle2[1]][1] == 1 else self.angle.append(
          math.degrees(np.pi - (a + b) / 2) + 180)
    else:
      self.angle.append(math.degrees(np.pi / 2 - (a + b) / 2)) if res[angle2[1]][1] == 1 else self.angle.append(math.degrees(np.pi / 2 - (a + b) / 2) + 180)
    print('短指针读数:%f' % self.angle[1])


  def get_center(self, mask):
    edg_output = cv.Canny(mask, 66, 150, 2)
    cv.imshow('edg', edg_output)
    # 外接矩形
    contours, hireachy = cv.findContours(edg_output, cv.RETR_TREE, cv.CHAIN_APPROX_SIMPLE)
    center = []
    for i, contour in enumerate(contours):
      x, y, w, h = cv.boundingRect(contour) # 外接矩形
      area = w * h # 面积
      if area > 1000 or area < 40:
        continue
      #print(area)
      # cv.circle(src, (np.int(cx), np.int(cy)), 3, (255), -1)
      cv.rectangle(self.src, (x, y), (x + w, y + h), (255, 0, 0), 1)
      cx = w / 2
      cy = h / 2
      cv.circle(self.src, (np.int(x + cx), np.int(y + cy)), 1, (255, 0, 0))
      center.extend([np.int(x + cx), np.int(y + cy)])
      break

    cv.imshow('center', self.src)
    return center


  def extract(self, image):
    red_lower1 = np.array([0, 43, 46])
    red_lower2 = np.array([156, 43, 46])
    red_upper1 = np.array([10, 255, 255])
    red_upper2 = np.array([180, 255, 255])
    frame = cv.cvtColor(image, cv.COLOR_BGR2HSV)
    mask1 = cv.inRange(frame, lowerb=red_lower1, upperb=red_upper1)
    mask2 = cv.inRange(frame, lowerb=red_lower2, upperb=red_upper2)
    mask = cv.add(mask1, mask2)
    mask = cv.bitwise_not(mask)
    cv.imshow('mask', mask)
    return mask


  def test(self):
    self.src = cv.resize(self.src, dsize=None, fx=0.5, fy=0.5) # 此处可以修改插值方式interpolation
    mask = self.extract(self.src)
    mask = cv.medianBlur(mask, ksize=5) # 去噪
    # 获取中心
    center = self.get_center(mask)
    # 去除多余黑色边框
    [y, x] = center
    mask = mask[x - 155:x + 155, y - 155:y + 155]
    cv.imshow('mask', mask)
    #self.find_short(center, mask)
    try:
      self.line_detect_possible_demo(mask, center, 20)
    except IndexError:
      try:
        self.src = cv.imread(self.name)
        self.src = cv.resize(self.src, dsize=None, fx=0.5, fy=0.5) # 此处可以修改插值方式interpolation
        self.src = cv.convertScaleAbs(self.src, alpha=1.4, beta=0)
        blur = cv.pyrMeanShiftFiltering(self.src, 10, 17)
        mask = self.extract(blur)
        self.line_detect_possible_demo(mask, center, 20)
      except IndexError:
        self.src = cv.imread(self.name)
        self.src = cv.resize(self.src, dsize=None, fx=0.5, fy=0.5) # 此处可以修改插值方式interpolation
        self.src = cv.normalize(self.src, dst=None, alpha=200, beta=10, norm_type=cv.NORM_MINMAX)

        blur = cv.pyrMeanShiftFiltering(self.src, 10, 17)
        mask = self.extract(blur)
        self.line_detect_possible_demo(mask, center, 20)


if __name__ == '__main__':
  apparatus = Apparatus('./BONC/1_0555.jpg')
  # 读取图片
  apparatus.test()
  k = cv.waitKey(0)
  if k == 27:
    cv.destroyAllWindows()
  elif k == ord('s'):
    cv.imwrite('new.jpg', apparatus.src)
    cv.destroyAllWindows()
长指针读数:77.070291
短指针读数:218.896747由结果可以看出精确度还是挺高的,但是这种方法有三个缺点:
- 当两个指针重合时候不太好处理
- 有时候hough直线检测只能检测出箭头的一条边,这时候就会报错,可以利用图像增强、角点检测和图像梯度来辅助解决,但是效果都不太好
- 计算角度很复杂!!(也可能是我想复杂了,不过这段代码确实花了大量时间)
代码里可能还有很多问题,希望大家多多指出
到此这篇关于OpenCV 表盘指针自动读数的示例代码的文章就介绍到这了,更多相关OpenCV 表盘自动读数内容请搜索python博客以前的文章或继续浏览下面的相关文章希望大家以后多多支持python博客!
-
<< 上一篇 下一篇 >>
标签:numpy matplotlib
OpenCV 表盘指针自动读数的示例代码
看: 1454次 时间:2020-07-22 分类 : python教程
- 相关文章
- 2021-12-20Python 实现图片色彩转换案例
- 2021-12-20python初学定义函数
- 2021-12-20图文详解Python如何导入自己编写的py文件
- 2021-12-20python二分法查找实例代码
- 2021-12-20Pyinstaller打包工具的使用以及避坑
- 2021-12-20Facebook开源一站式服务python时序利器Kats详解
- 2021-12-20pyCaret效率倍增开源低代码的python机器学习工具
- 2021-12-20python机器学习使数据更鲜活的可视化工具Pandas_Alive
- 2021-12-20python读写文件with open的介绍
- 2021-12-20Python生成任意波形并存为txt的实现
-
搜索
-
-
推荐资源
-
Powered By python教程网 鲁ICP备18013710号
python博客 - 小白学python最友好的网站!